Wednesday, June 26, 2013

Crunchy Garlic Oven Fried Chicken

 I was craving crispy, crunchy, delicious fried chicken. Unfortunately for the past 11 months most of our stuff has been in storage, including most of my kitchen stuff. My husband and toddler and I have been living in a tiny 1 bedroom apartment for the past 11 months. Luckily the lease is up at the end of next month and we are moving to a 2 bedroom townhouse. I will soon have my kitchen stuff back.  I. Can. Not. Wait. 

So back to the fried chicken craving. We very much enjoy the fried chicken I make, but I am currently without my deep fryer. I much prefer to make fried chicken in my deep fryer instead of a skillet. So what's a girl to do? Adapt. So instead of using the same recipe I use for my fried chicken and just putting it in the oven, I made it completely different. 


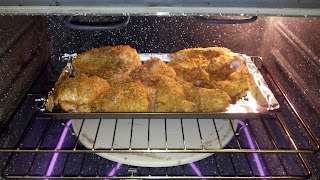
Forgot to take a picture of the process. But here's the chicken in the oven. It hasn't even cooked yet and it already looks yummy. 

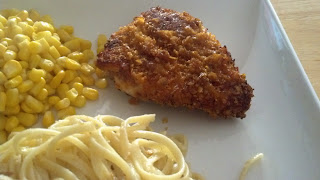
Oh my goodness. It was so good! So crunchy. So flavorful. So delicious.

I had to stop myself from eating more of it. Just looking at this picture I am wanting it again....right now....
You have to try this chicken. You won't regret it. 


Crunchy Garlic Oven Fried Chicken
1/2 C butter, melted
2 C Cornflake crumbs (4 C of whole cornflakes will give you 2 C of crumbs)
2 t paprika
2 T garlic powder
1/2 t dry mustard
1 packet Good Seasons Italian Dressing Mix
1/2 t pepper
3-4 lb chicken, cut into pieces
Preheat oven to 425*F. In a large bowl combine cornflake crumbs, garlic powder, paprika, dry mustard, Italian Dressing Mix, and pepper. Dip chicken in melted butter and turn in crumbs to coat completely. Place chicken, skin side down, on a baking sheet lined with foil (for easier clean-up). Bake uncovered 30 min. Turn chicken over and bake about 30 min longer, until juices run clear when thickest piece is cut. (I usually go by meat thermometer just to be on the safe side-breasts 165-170 degrees and dark meat about 180 degrees)


For boneless, skinless breasts Bake at 425*F for 20-25 min or until chicken is done.


Enjoy!                                            
Sandi 

Tuesday, June 25, 2013

Blueberry Buckle Coffee Cake

I had a couple pints of blueberries that I was trying to find the time to use - naps have been sporadic lately - and I kept thinking I'd like to try a buckle/slump type of thing with them. Then I remembered a King Arthur Flour recipe that I had tried a while back, which I remembered being pretty fast and really tasty, so I decided to look it up again. This time I made a few changes to make it more 'my own' and I was really happy with the results. Hubby liked it so much that the entire 9x13 pan was gone in just two days! 

Because I was racing the nap clock on this one, I skipped the play-by-play photos to make sure I could get it done, but I got one right after I took it out of the oven - you can see the lovely browned topping that was so tempting I snitched a couple of the larger clumps right then and there! 
I doubled the original recipe because I know how much hubby likes anything with blueberries. I used half whole wheat flour, and a smaller amount of brown sugar rather than the white the recipe called for, and I added some oats to the topping. Since we are dairy free, I used a 6 oz container of plain coconut-milk yogurt with 2 oz of rice milk to make the rest of the cup of milk. This makes a huge difference in the texture, it's more like using buttermilk, whereas using all rice milk is a bit like using water. By far my favorite alteration was to replace 1/4 of the amount of vanilla with lemon extract - this gives the cake a very light citrusy sweetness, but doesn't make it actually taste like lemon. I highly recommend this as a 'secret ingredient' in any fruity baked goods calling for vanilla.
And here is the recipe to make it as I did:

Batter
2 cups all-purpose flour
2 cups white whole wheat flour
4 tsp baking powder
1 tsp salt
1 cup brown sugar
1/2 cup coconut oil
2 eggs
1 1/2 tsp vanilla extract
1/2 tsp lemon extract
6 oz plain coconut-milk yogurt
2 oz rice milk
4 cups fresh blueberries

Blend the dry ingredients in a bowl and set aside. Stir together the yogurt and rice milk in a measuring cup. In a large bowl cream together the sugar, coconut oil, eggs, and extracts. Alternately add small amounts of the flour mixture and milk to the mixing bowl, beginning and ending with flour. Fold in blueberries.

Topping
1/2 cup brown sugar
1 cup all-purpose flour
1 cup oats
2 tsp cinnamon
1/2 cup olive oil

Mix dry ingredients, blend in oil until mixture is crumbly.

Preheat oven to 375*. Grease and flour a 9x13 pan. Spread batter into prepared pan, then sprinkle/crumble topping over the batter. Bake for 40-45 minutes or until toothpick comes out clean.

Enjoy!                                            
Sue

Saturday, June 22, 2013

Whole Wheat Banana Muffins

I love banana muffins. Well, I love muffins in general, most kinds of muffins really. There's just something great about breakfast food in a little portable package. Especially when they are the perfect size for little toddler hands to tote around. Our toddler LOVES muffins! And he hardly ever stays sitting down for very long so muffins are great for him. These muffins have whole wheat flour, no oil and less sugar, so they are a little healthier too. I love using whole wheat flour in baked goods. Sometimes the whole wheat flour makes the baked goods turn out better than they did using just all purpose flour. 


Combine flour, sugar, baking powder, salt, cinnamon, and nutmeg
(cinnamon and nutmeg are optional but I like the flavor with it in there)


 In another large bowl combine milk, egg, vanilla, applesauce and mashed banana


Add the dry ingredients all at once to the wet ingredients. Stir just until combined.


Grease bottoms of muffin cups (or use paper baking cups).

 I found this non stick Coconut Oil Spray at Trader Joe's. I've been enjoying using it very much. Smells a little like coconuts when you spray it onto something but does not impart any flavor in what you're cooking. 
*I have not been compensated in any way for that statement. I just happen to like this product and wanted to let you know about it.* 

Fill muffin cups about 3/4 full and bake at 400*F 20-25 min

And they should come out nice and golden brown and puffed up

Whole wheat, less sugar, no oil. Healthier. Toddler approved. And yummy! Can't beat that!

Whole Wheat Banana Muffins
1 C all purpose flour
1 C whole wheat flour
1/4 C brown sugar
2 t baking powder
1/2 t salt
1/4 t cinnamon (optional)
1/8 t nutmeg (optional)
1 egg
1/2 C milk
1/4 C unsweetened applesauce
1 t vanilla
2 very ripe bananas (about 1 C total mashed banana)
Preheat oven to 400*F. Grease bottoms only of 12 muffin cups (shortening or non-stick cooking spray) or use paper baking cups. In a med sized bowl combine flour, sugar, baking powder, salt, cinnamon and nutmeg. In a large bowl beat milk, egg, applesauce, vanilla and banana with a whisk until combined. Add flour mixture all at once into banana mixture and stir just until combined. Fill muffin cups about 3/4 full. Bake 20-25 min or until golden brown and a toothpick inserted in the center of muffin comes out clean. Let stand about 5 min in the pan and remove to a wire rack or baking towel to cool. Store in airtight container after cooled completely.


Enjoy!                                            

Sandi 

Thursday, June 20, 2013

7-Up Biscuits

I have seen this recipe all over Pinterest and Facebook. I kept saying to myself '7-Up? In biscuits? Really? Gotta be kidding?' Well I finally decided to try them. I have to tell you....AMAZING! By far the best biscuits I have ever made. And aside from my mothers biscuits they are the best biscuits I have ever had. You honestly can not tell there is soda in them. They were so light and fluffy and my goodness they were buttery! You can not beat biscuits that turn out like this with 4 ingredients....YES, I said 4 ingredients! So simple and quick and DELICIOUS! I don't know who came up with this recipe but they are a genius. 

I couldn't even wait to get them in the oven. I was so anxious to try them I forgot to take pictures of the process of making them....and before I put them in the oven....

 And I was so ready to try them that I forgot to take a picture of them before I removed two biscuits from the pan. But can you see how nice and fluffy they are? Oh and the browned bits in the pan...it's butter....OH MY GOODNESS they are so good!  These would be so very delicious with my sausage gravy! 

I made two substitutions since I did not have sour cream or 7-Up. 

7-Up Biscuits
4 C Bisquick
1 C Plain Greek Yogurt
1 C Sprite
1/2 C Butter, melted
Preheat oven to 425*F. In a large bowl combine Bisquick, Greek yogurt and Sprite. The dough will be very soft and sticky. Dust a surface (counter top, large cutting board, silicone rolling mat etc) with some Bisquick. Turn out dough onto dusted surface and knead until the dough is coated with the baking mix and pulls together nicely. Use more Bisquick if needed. Pat dough out until it's about 1 1/2" thick and cut biscuits with a biscuit cutter. Gather remaining dough and pat out and cut biscuits again until all dough is used. (I was able to get the 12 biscuits I needed and used all the dough) Place melted butter in 13x9" pan and make sure bottom is coated fairly evenly with the butter. Place biscuits on top of butter. Bake for 12-15 min or until golden brown and done in the middle. 

Enjoy!                                            
Sandi 

Wednesday, June 19, 2013

Lemon Cream Cheese Frosting

This recipe was going to be part of a cupcake recipe. Well the cupcakes didn't turn out how I wanted them to. The recipe needs some tweaking and I will post them at a later date when I get them the way I want them. So for now I thought I would share with you this deliciously sweet and tart cream cheese frosting and the story behind it.

It was quite an ordeal, let me tell you. First of all, it took me two days to complete this....
I got all the cake ingredients pulled out and measured and our toddler, who started out in a good mood, turned into Captain Cranky Pants on the day of this experiment and decided he wanted mommy's undivided attention. So I had to pause for a few hours. This is why I usually bake/experiment when he is sleeping...

Once he decided he was ok with me being in the kitchen I mixed up the batter and he was enjoying watching the beaters spin around in the bowl. Now, I needed quite a bit of lemon zest for the cupcakes-1 Tablespoon- Plus I needed another 2 teaspoons for the frosting. Well apparently I had freakishly small lemons....I just barely got the 1 Tablespoon I needed for the batter with 3 lemons....so minus the expletives I was thinking (not saying...toddler in the room...) Great! No more lemons... Frosting waits until tomorrow. I texted my husband and asked him to bring home lemons. Once I had the lemons (which by the way turned out to be normal lemons and I got the 2 teaspoons needed with 1 lemon) it was too late to deal with frosting so I did it the next day. The frosting turned out exactly as I wanted it to.


Beat the cream cheese, butter, lemon juice and zest until light and fluffy.


 Gradually beat in the powdered sugar until just blended
(I did it in 3 increments so my black shirt didn't become white...) 


 Chill for at least 1 hour before using. And store frosted cake or cupcakes in the fridge. 

 I love that you can see the zest in the frosting. 


Lemon Cream Cheese Frosting
8 oz cream cheese, softened
2 T butter, softened
3 t lemon juice
2 t lemon zest
3 1/2 C powdered sugar

In a large bowl combine cream cheese, butter, lemon juice and lemon zest. Beat on high speed with electric mixer until light and fluffy. Gradually add powdered sugar and beat on low speed just until combined. Chill for at least 1 hour before using.


Enjoy!                                            
Sandi

Homemade Cinnamon Sugar

You may already know how to and make your own cinnamon sugar. But in the event that you don't, here's my recipe. I like my cinnamon sugar with a little extra cinnamon. 
I make a bunch at a time and keep it in a canister so it's ready when I need it. 

You can use cinnamon sugar for so many things. I sprinkle it on top of my blueberry cake and banana cake and sometimes muffins prior to baking, and when some muffins are done baking I dip the top in melted butter and then dip in cinnamon sugar, and sprinkle it on buttered toast. Just to name a few.... MMMMMMM cinnamony sugary goodness!


Cinnamon Sugar
2 C granulated sugar
3-4 T ground cinnamon (depending on how much cinnamon you like)
Combine in a med bowl and store in and airtight container at room temperature. 


Enjoy!                                            
Sandi 

Tuesday, June 18, 2013

Egg Rolls

I will be the first to admit that I have several food 'addictions' that I just cannot shake - and really, I see no reason to try, because it makes me happy not to... One of these is egg rolls. Rather than be dependent upon takeout, which my husband can't eat anyway, I love to make my own. I have made them by pan-frying and by baking the finished rolls, and they turn out well either way, so they are quite a bit healthier than takeout as an added bonus. 

The other really nice thing about making your own egg rolls is that you get to decide what goes in them. I have made several variations, they can be savory or sweet. I had extra wrappers in the fridge at the same time that I had leftover chicken pot pie filling, and while they were a bit drippy, they were quite tasty. I have also made them with homemade apple pie filling, yumm. The only guideline I would recommend following is to make sure the filling doesn't have sharp edges that will puncture the wrap - this is usually easy to accomplish if you cook your filling before making the rolls.

For this batch, I decided to go pretty traditional. I used 2 lbs of ground pork, a nice big green cabbage, 4 carrots, and 4 cloves of garlic. Shred the cabbage and carrots and mince the garlic.
I have made my own dumpling wrappers, which could be modified into egg roll wrappers, but it is sooo much easier to just purchase them. The seasonings I like to use are ginger juice (because I always end up with multiple bleeding knuckles when I try to grate my own fresh ginger...), fish sauce, coconut aminos (my allergy friendly substitute for soy sauce), and sriracha.
Put your minced garlic with a drizzle of olive oil into a cold wok or large, deep skillet and turn the heat on to medium-high. The garlic will begin to cook while the pan heats, once you can start to smell the garlic but before it starts to brown, add your ground pork. Break up the ground pork with a wooden spoon or spatula while it cooks; once you have it broken into small bits, add your shredded cabbage and carrots and stir together. Add a couple teaspoons of ginger juice or fresh grated ginger (or use powdered if you have neither), about 10-12 shakes each of the fish sauce and coconut aminos or soy sauce, and a liberal squeeze of sriracha. (Have I mentioned that I tend not to measure ingredients.... I do apologize for this if 'winging it' is difficult for you, but this is an easy way to get used to doing so, because it is really hard to screw this up - just start with a little bit and taste it, then add more until you have the flavor you like. You can do it, I believe in you!) Stir seasonings in and finish cooking until veggies are softened.
You can go ahead and use the filling right away - just be careful not to burn your fingers - or you can allow it to cool, and even refrigerate for up to two days before using. It is usually more convenient for me to make the filling during the day (read: while the baby takes a nap) and then refrigerate until I have more time to fill the rolls. I didn't take photos of the roll filling process due to messy fingers, but the package insert that comes with the wrappers has instructional diagrams. Use as much or as little filling for each roll that you like - another perk of making your own - you get to decide whether you want skinny rolls or big chunky ones. Do make sure you have a bowl of water to moisten the last corner with to help seal the edge. Once you have rolled the amount you want to cook, heat up a drizzle of olive oil in your large skillet and brown on each side - start by placing the sealed edge down. Or, line a baking sheet with foil and bake the rolls at 425* until they start to brown.
Voila! Homemade egg rolls! I enjoy them just as they are, hubby likes to dip them in sweet chili sauce. They are delicious hot, and leftovers are fantastic cold or can be reheated either in the oven or toaster oven. They freeze well too!

Enjoy!                                            
Sue

Thursday, June 13, 2013

Healthy Strawberry Banana "Milkshakes"

This was so yummy and refreshing. You would never know that it's healthy. And the best part- our toddler LOVES it!! You really can't beat a 3 ingredient healthy milkshake. Especially on a hot day when you need a snack but don't want to heat up the kitchen. This is something cool and refreshing you are sure to love if you like bananas and strawberries. 
 I found the recipe on one of my favorite food blogs, Sally's Baking Addiction, and only slightly adapted it. I needed a little more milk than she used and I added a few more strawberries. 
(Click here for her original recipe)

The amounts I used were enough for 2 shakes. 
I am definitely going to try this with blueberries. And maybe pineapple and peaches. 


This one is for my toddler. It's a plastic cup....

It's a pretty big cup and he actually drank most of it too.

Puree the frozen banana chunks and milk in your blender until it's a smooth, soft-serve like consistency

 Add the strawberries

 puree again until all the strawberries are blended into the banana nicely

 And pour into glasses and enjoy the nice cool refreshing strawberry banana goodness


Healthy Strawberry Banana “Milkshake”
3 ripe bananas, peel removed, cut into chunks and frozen
10 strawberries, halved
1/2-3/4 C milk (any kind-regular milk, soy milk, almond milk, rice milk, etc)
In a blender puree frozen banana chunks and milk until smooth and soft-serve like consistency. Add strawberry halves and puree again until strawberries are blended into banana nicely. Pour into glasses and serve. Makes enough for 2 shakes.


Enjoy!                                            
Sandi 


Scallop Newburg Pasta


 I have so many fond memories of cooking with and watching my grandparents cook. This recipe is an adaptation of a recipe for Lobster Newburg that my grandmother made.When I was growing up my Grandmother would serve Lobster Newburg over toast points. And I LOVE it that way, but I was feeling pasta with seafood.

 Lobster is one of my favorite foods in the whole world. But let's face it, Lobster is EXPENSIVE. Scallops are a little cheaper and you can get some pretty good ones in the freezer section at your grocery store. I definitely prefer fresh seafood when I can get it, but for this recipe I used frozen scallops. This would also be very good with shrimp or even a mixture of seafood.


Saute scallops in garlic butter

 Flip over half way though cooking to brown both sides


 Use enough milk to make a nice thick sauce that will coat your noodles. 
Looking back on this photo, my scallop to sauce ratio is a little off and I need some more scallops in there...

 And serve over noodles. 


Scallop Newburg Pasta
-adaptation of Lobster Newburg-
(adapted slightly from recipe used by my Grandmother)
2 C scallops, halved if large scallops
*seasoned flour for dredging
about 1 C milk
2 T garlic butter (I make my own-click here for the recipe)
hot cooked noodles-I used egg noodles
Dredge scallops in seasoned flour. Heat the garlic butter in a large skillet over med heat. Add scallops and fry until done, flipping once halfway through cooking. They cook pretty quickly so they should only take a few minutes. When scallops are done add enough milk to make a nice sauce. Sauce should be thick enough to coat the noodles. If it’s too thick add a little more milk at a time until you get the consistency you’re looking for. Serve over noodles. If you like you can serve over buttered toast triangles like Gram did.

*Seasoned flour*
about 1 C flour
pinch of salt and pepper or to taste
1-2 t garlic powder
1 t paprika (for color)
Combine flour, salt, pepper, garlic and paprika in a shallow dish.

Enjoy!                                            

Sandi 

Homemade Garlic Butter


We love garlic bread with pasta. I used to buy pre-made garlic bread from the bakery section at the grocery store and even sometimes the frozen garlic bread. Then a few years ago I decided I was sick of that and started making my own garlic butter. To be quite honest it is so much better when you make it yourself.


Garlic Butter
1 stick butter, softened to room temp
1 1/2 t garlic powder
1 T parsley flakes


Combine all ingredients. 
I've found if I make the garlic butter a few hours ahead of when I need it the garlic flavor permeates the butter nicely. If you're not going to be using the butter that day, I would suggest storing it in the fridge to keep it fresher longer.


If you want to make homemade Garlic Bread, spread onto sliced Italian or French bread and fit the slices back together to form the loaf again. Place on a large sheet of aluminum foil and fold up the foil to cover the bread. Bake at 350*F for 10-15 min or until desired crispiness (is that a word?) is achieved. If you leave the foil closed you will end up with a slightly softer garlic bread. If you want a bit crispier bread, bake it for about 10 min then open the foil and bake it for a few more min.


Enjoy!                                            
Sandi

Wednesday, June 12, 2013

Cherry Pie!


I love pie. Any kind of pie will make my day, but fruit pies are probably my favorite. There's just something about the combination of fresh fruit with pie crust and a little cinnamon sugar....

And when you have access to these beautiful fresh cherries at your local farmers' market, why not turn them into pie? 


First, prepare your fruit. I should tell you now how much fruit to use, but this is one thing I never measure. You want the fruit to fill your pie dish - if you use a shallow dish you will use less fruit than if you have a deep dish. Also, some fruit shrinks more than other fruit while it cooks. I generally eyeball it, but I would guess my pie dish holds between 4 and 6 cups of fruit. If you are not sure, just put your fruit into your pie dish as you cut it so you can see how much you want to use. I halved my cherries, partly because I like halves in my pie and partly because I do not own a cherry pitting tool...
Once cut, the cherries can be set aside while you move on to the crust. If you are using a fruit like apples that will oxidize and are worried about them turning brown, you can add a splash of lemon juice and stir them around - but really, you're going to bake it so does it matter if they change color first?

Next, the most important thing about a pie, to me, is the crust. I am a pie crust snob. Yes, I admit it. And it is entirely because I was spoiled growing up with a mother and grandmother that made the best pie crust - I think the first time I ever had store-bought pie crust was when I was in college... So I will share with you my favorite pie crust recipe, which is slightly adapted from Gram's recipe. Feel free to use whatever your favorite crust is though - whether you have a tried and true recipe that you love, or you just want that premade crust from the grocery store.

Start by stirring together 2 cups all purpose flour, 1/4 teaspoon baking powder, and 1/8 teaspoon salt in your favorite mixing bowl. Add 8 tablespoons coconut oil **(I use coconut oil because it is solid at room temperature but melts easily, hubby is not allergic to it, and it also gives the crust a pleasant flavor, but if you love using butter or another shortening by all means do that instead).
And cut it into the flour mixture until you have fine crumbs. If you do not own one of these handy pastry blenders, just use a couple of butter knives or a stiff spatula, or even just roll it through your fingers. I like the pastry blender because it is fast and easy.
Drizzle in a bit of cold water **this is important, if your water is not cold, it will melt your shortening and your crust will not turn out right**. Again, something I don't measure because it depends on the humidity the day you are baking, etc. Just start with a small amount and stir it in.
 This dough is still pretty shaggy, so it needs a touch more water.
And now it has come together nicely - this is what you are looking for. If you accidentally get too much water and your dough is wet, just sprinkle a bit more flour on and incorporate it.
Prepare your rolling surface by sprinkling it with flour. I use a silicon mat - again because it makes life easier - but a clean countertop or large cutting board will also work just fine. Then turn your dough ball onto the surface and sprinkle a little flour on top.
Knead just enough to make sure the dough will be easy to handle (read: not sticky), then split the dough in half.
Set half aside for the top crust (or if you are making a single-crust pie, use it to make pinwheel cookies, which will be a post for another day) and form the half you are using into a large hockey puck. Roll the edge of this 'wheel' gently to keep the edge from going all ragged as you roll the crust out.
Roll the crust out to a uniform thickness large enough to fill your pie dish and overlap the edge. Transfer to the pie dish and roll the other half out in preparation for the top of the pie. Notice in the photo the little pockets of coconut oil - these will melt as the crust bakes and leave it light and flaky.
Now we're ready for the filling. I really like to taste the fruit with it's natural sweet-tartness so I tend to use a bit less sugar than most people probably do in their pies...I added 3 tablespoons flour and 2 tablespoons powdered sugar to my cherries.
 Gently stir together and transfer to pie dish with the bottom crust waiting for you.
And top with your second crust. Now for the best part: you probably noticed that there was no cinnamon in the filling - again, this is because I really wanted to taste the cherries, but feel free to add some if you really want. What I do really love is cinnamon in the crust - so before you seal the two crusts together, fold back the top edges and sprinkle cinnamon sugar where the two meet.
 Then fold and crimp your edges to seal in all the goodness.
I was in a cinnamon-y mood, so I sprinkled more cinnamon sugar over the top of the crust. You also want to cut a few slits in the crust to vent steam, this will prevent the crust from being puffed up away from the fruit when your pie is finished.
Then you're going to put the pie in a 425* oven for 25-35 minutes (actually, depending on your oven it could end up being longer, but my oven is quite efficient). You will know it is done when the filling is bubbling up out of your venting slits and the crust is a pretty golden brown.
Let the pie cool to room temperature before you slice it. This will allow the filling to set so it doesn't run all over the dish. If you absolutely cannot wait and must eat warm pie...just do it. There is absolutely nothing wrong with the more sauce-like consistency of the filling before it sets, nor is there anything wrong with indulging your need for warm pie - and don't let anyone tell you otherwise!

I did manage to allow this pie to cool before slicing, but mostly because I was so busy that it had to wait until later.
And by the time I was finished taking this photo, hubby had already finished the slice I gave him first. He watched me eat mine with puppy-dog eyes, and although I wouldn't share, I was forgiven when I gave him a second slice all to himself.

Enjoy!                                            
Sue