Monday, March 31, 2014

Sour Pickles

If you're anything like me, you've stopped to browse through the pickle section of your grocery store at least once hoping to see something new, interesting, and hopefully tasty, that doesn't contain a bunch of high fructose corn syrup and yellow dye. I'm serious about that, if you've never read the ingredients on your pickle jar, it may shock you to learn that most of the big brands feel the need to dye their pickles. This may or may not bother you, either way, I have come to the conclusion that most of those pickles are over sweetened for my tastes. There are a handful of small-batch pickle producers that make a good product, but when I'm in the mood for a good sour pickle, I really like to make my own. 

Don't be intimidated by this idea, it is actually incredibly simple! This pickle recipe includes only four ingredients that you probably already have in your cupboards, in addition to fresh cucumbers and a little water. 

I grew up on these pickles, and it makes me smile every time I use my Gram's cookbook to make them or anything else. It also makes my mouth pucker just to think about them, let alone when I open the jar and smell that lovely brine! And to be honest, I'm getting a good chuckle right now imagining how many of my family members reading this are feeling that pucker and about to go make some pickles now too! 

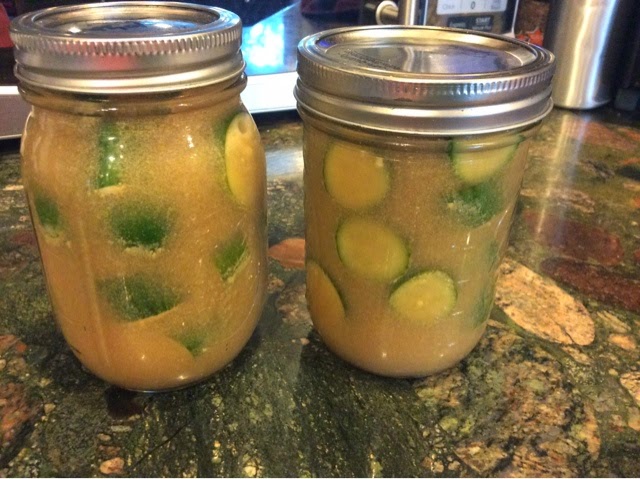
Start by mixing the dry mustard, sugar, and salt with the cider vinegar and water. Here I have the dry in one jar and the liquids in another just to show this step. Wash and slice your cucumbers if you want them to pickle quickly, just a few hours in the brine will put flavor into the slices. Leave them whole if you prefer, but you'll have to wait at least over night for the flavor to get into whole cukes. Also, if you want whole ones, make sure you have jars large enough to hold the whole cucumbers! I wanted my pickles now so I sliced the cukes. Also, I couldn't seem to find the large jar I thought I had, so I ended up splitting the batch into two pint jars. 

Fill your jar or jars with cucumber slices or whole cukes, and pour in the brine to completely cover them. Ensure a good seal on the jars and refrigerate. The brine will separate a bit as gravity does its work, you will see clumpy sediment areas of the mustard mixture and the fluid will look a bit more clear, just shake the jars and it will all come back together. 

These pickles were in the brine for only about three hours before I couldn't wait any longer, and they already had plenty of flavor. Of course, the longer they sit, the stronger the flavor will become. Also, I managed to save some for a couple weeks to see how long they would stay crisp, and they were still not soggy floppy messes like some inferior purchased pickles I've experienced. Another nice thing about this brine is that after you've eaten all your pickles, just wash and slice a few more cucumbers and add them to the brine jar to make more! 

And here's the recipe so you can make your very own! 

Sour Pickles

Fresh cucumbers (about 6, depending on size of cukes and size of your containers)
          (for best results use the small pickling or Persian cucumber variety)
2 Tbsp dry mustard
2 Tbsp salt
3 Tbsp sugar
1 1/4 Cups apple cider vinegar
1/2 to 3/4 Cup cold water 
          (if you like the taste to be quite sour, use smaller amount of water, 
           for a slightly mellowed but still nicely sour flavor use the larger amount)

Wash and optionally slice cucumbers and place in resealable glass jar or jars. Combine all brine ingredients and pour into jars to completely cover cucumbers. Refrigerate and wait a few hours for sliced cucumbers or over night for whole ones to become pickled. Use a fork to fish the pickles out of the jar and consume with alacrity. 

Enjoy!                                            
Sue

Thursday, March 20, 2014

Carrot Oatmeal Raisin Cookies

Wow, time really flies when you have a toddler! I feel like just yesterday I was telling you all how my holiday projects were finished so I could spend some more time blogging... Then so much more started happening around here that my plans flew right out the window, and here it has been over a month since I've posted again! Now I've completed another big project and I'm really appalled at the number of posts that I've back-logged for myself. This time instead of trying to play catch up and just ending up with more new post ideas piling up, I'm deciding to start with new material and work my way back to revisiting some of my older ideas as I get back into the swing. Alright, enough about me, let's get to the reason you're reading this post - cookies!


I was shredding some carrots to make egg rolls a few days ago (if you haven't tried them yet, here's a link to that recipe for you. I know, you're here for a cookie recipe, but trust me on this one...) and as I was using my Kitchenaid attachment to avoid shredding my fingers, which I always do when I use a hand grater, I was admiring the growing pile of pretty orange and yellow shreds. I started thinking to myself that it might be nice to make some muffins or something with these lovely carrots, so I shredded an extra pile of them and tossed them in a container in the fridge to consider my options while I finished the egg rolls. 

See what I mean? They're just begging to be made into something nice!

The next day, I was all set to start making muffins when inspiration struck: what if I made a cookie?! Something with oats, a little breakfasty, not really sweet, something that would make a great healthy snack during my husband's long work days (that he would also enjoy eating)... So I started searching for recipe ideas. The one I found on the Quaker website was closest to what I was looking for, but I still tweaked it a little to really get what I wanted. I asked my husband to really critique them while he ate the first batch, because I had enough carrot already shredded to make a second batch, and I wanted to know if there was anything he'd like me to do differently. The verdict: great texture, perfect amount of raisins, delicious flavor. There wasn't anything he would change, except maybe sprinkle a little cinnamon sugar on a few to see how they were as more of a dessert. So I'm adding this one to the list of 'make often' and I hope you like it too!
  
Start by putting your raisins in a bowl and covering them with hot water. This will allow them to rehydrate and plump while you get everything else ready. Here's a side by side view of why this is a good idea:

Combine all the dry ingredients in a bowl and set aside. 


In your mixing bowl, cream together the honey and shortening of your choice (I use coconut oil). 


Beat in the egg, vanilla, and applesauce, then add the carrots and mix well. 


Stir in the dry ingredients all at once, mixing just until combined. 


Drain the raisins, and fold them in. 


Drop by spoonfuls (or use a cookie scoop like I do) onto a parchment lined baking sheet and spread to your desired shape. They should puff just a little, but the cookies will not spread out as they bake, so whatever shape they go into the oven is the shape they will come out.


Bake in a preheated 350* oven for 10-12 minutes, until edges are just starting to brown and center is set. 


Half of the second batch got a sprinkle of cinnamon sugar on top just before baking, here they are after:


Allow to rest on the pan for a few minutes before transferring to a rack to cool completely. Store in an airtight container. These cookies are at their best when eaten fresh, within three days of baking. Hubby's final verdict was that the first day, they are perfect without the cinnamon sugar, and the third day they are better with the cinnamon sugar. 

And here's the recipe for you:

Carrot Oatmeal Raisin Cookies

2 Cups old fashioned rolled oats
1 Cup whole wheat flour
2 Tbsp ground flax seed meal
1 tsp baking soda
1 tsp baking powder
1/2 tsp salt
1/2 tsp ground cinnamon
1/2 tsp ground nutmeg
1/2 tsp ground ginger
1/4 tsp ground cloves
1/4 Cup honey
1/4 Cup coconut oil (or your preferred shortening)
1 egg
1/3 Cup unsweetened applesauce
1 tsp vanilla
1 Cup shredded carrot
1/2 Cup raisins

Put raisins in a small bowl with enough hot water to completely cover them, set aside. 
Combine all dry ingredients in a medium bowl, set aside. 
In a mixing bowl, cream together honey and coconut oil. Beat in egg, applesauce, and vanilla. Add carrots and mix well. Add dry ingredients all at once, mix just until combined. Drain raisins, then fold them into dough. 
Preheat oven to 350*. 
Drop dough by spoonfuls or cookie scoop onto a parchment lined baking sheet, and spread to desired shape (cookies will not spread while baking). Bake 10-12 minutes, until edges are just starting to brown and center is set. Allow to cool a few minutes on pan before transferring to a rack to cool completely. 
Store in an airtight container. Cookies are best within three days of baking. 

Enjoy!                                            
Sue