Sunday, July 28, 2013

Pig Candy

So most of you are probably thinking "What the heck is pig candy???" and some of you are probably imagining a variety of creative things... Well, I'm not sure how the name 'pig candy' was first applied to these delicious pork ribs, but it sort of stuck because eating them is a little like eating candy - they are so good, it makes you feel a little giddy. 

I adapted this recipe from one by Alton Brown that I found when I wanted to try a new method for preparing babyback ribs. I have also used this same recipe to prepare a bone-in pork butt roast with great success, but I think ribs are probably the favorite medium in my house. 

Start with your spice rub: combine the brown sugar and all the spices in a small bowl.

Once your spices are mixed, lay out your rack of ribs (this one is actually pork spareribs rather than back ribs, they both work very well) on double aluminum foil. Rub the spices all over the meat, front and back. 

Then lay another sheet of foil over the top of the ribs, and fold up the upper sheet from underneath the ribs to make a neat little packet. Be sure to leave one short edge loosely sealed, so you can easily open it. Then pop the packet back into the fridge for at least one hour to give the spices time to really flavor the ribs.

Here is why you want one short edge easy to open. Right before you are ready to start cooking, mix up your braising sauce and microwave for one minute. Then open that short edge of your foil packet, pour the sauce inside and reseal the foil packet. Tilt the pan to be sure the sauce distributes all the way down the rack.

Then fold up the extra sheet of foil underneath to contain any sauce that comes out of the packet. You might be tempted to skip the double layer of foil to begin with. Don't - really. I can tell you from experience that any holes the bones poke in the foil will cause all the sauce to drain out and burn onto your cookie sheet. It isn't pretty. And you also lose that flavor for the ribs. So do yourself a favor and use double foil underneath. And into the 225* oven for two and a half hours for a nice slow braise.

At the end of the cooking time, open the foil packet carefully at that easy open edge you left and pour the sauce into a medium saucepan. You can open the packet all the way and admire how the ribs are separating from the bone - they are essentially done now, we are just going to add more flavor in the last step. 

Simmer the sauce to reduce - this will take at least twenty minutes, to get from a watery state to a more syrupy state. Pour the syrupy sauce over the ribs. Marvel. But wait - we're not done!

Pop those beauties under the broiler for a couple minutes to caramelize that lovely sauce. Mmmmm.

Cut the ribs into sections containing one to three bones each. You choose based on your serving desires and your patience to cut between each bone. I usually do 2-bone sections.

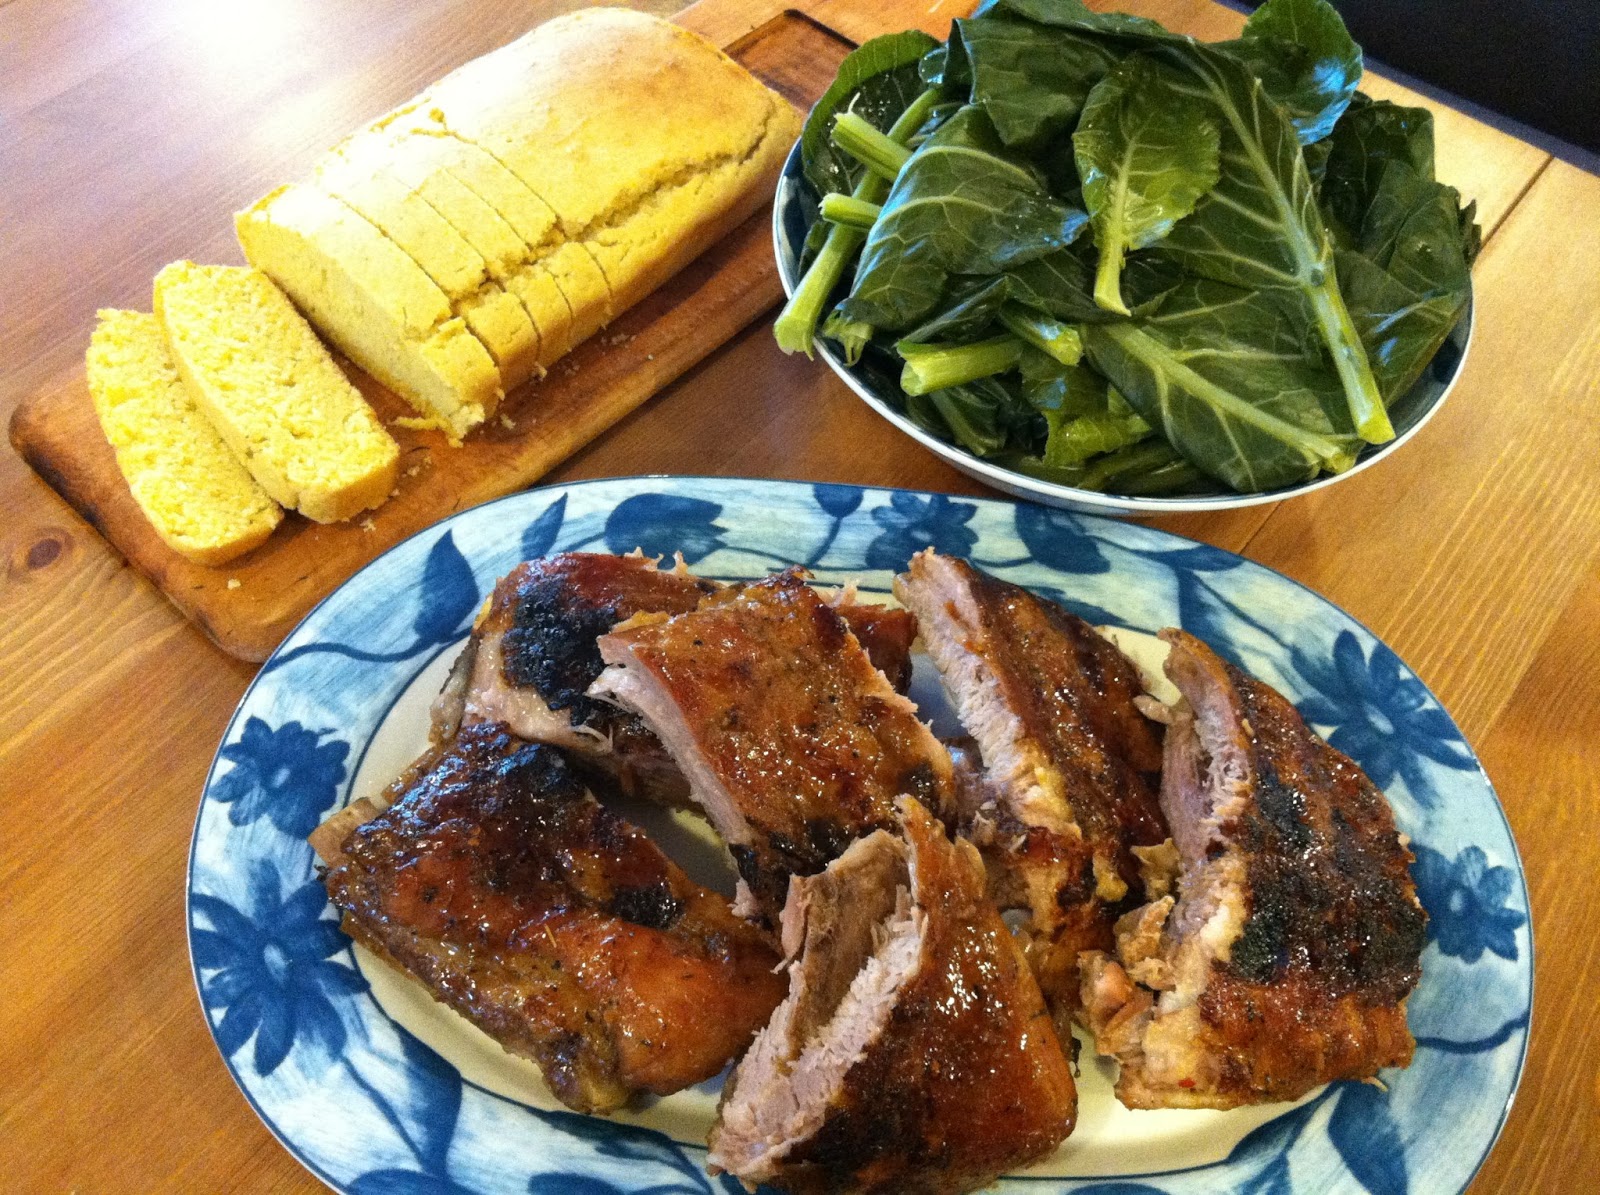
Serve with your favorite accompaniments. We love these ribs with cornbread and collard greens. 

Pig Candy
1 rack pork back ribs or spare ribs (or other bone-in cut of your choice weighing about 2-3 lbs)

Spice Rub
2 Tbsp brown sugar
1 tsp sea salt
1 tsp chili powder
1/4 tsp thyme
1/4 tsp cayenne
1/8 tsp fresh ground black pepper
1/8 tsp crushed red pepper
1/8 tsp Old Bay seasoning
1/8 tsp onion powder

Braising Sauce
1/2 cup wine (use whatever you have open, either red or white work fine)
1 Tbsp red wine vinegar
1 Tbsp Worcestershire sauce
1/2 Tbsp honey
2 cloves garlic, minced

Combine all ingredients for spice rub in a small bowl. Lay out ribs on double layer of aluminum foil, rub all over with spice rub. Cover with another sheet of foil and fold into a packet. Refrigerate for at least one hour.
Preheat oven to 225*.
Combine all ingredients for braising sauce in small measuring cup. Microwave one minute. Open one end of foil packet and pour sauce in, tipping to distribute sauce all along the ribs. Reseal foil packet, fold extra sheet of foil up around packet. Bake for 2 1/2 hours.
Carefully open one end of packet and pour sauce out into medium saucepan. Simmer sauce to reduce, at least twenty minutes, until it reaches a syrupy consistency. Remove foil from top of ribs, pour sauce over ribs. Broil for 2-4 minutes, until sauce is caramelized.
Cut ribs into sections of 1-3 bones each. Serve with your favorite accompaniments.

Enjoy!                                            
Sue

Wednesday, July 24, 2013

Cornbread

I am a huge fan of cornbread. So is my husband, as he will invariably ask me "You gonna eat yo caawnbread?" if he finishes his before I finish mine. Or even if he still has some, but thinks he will want more... so pretty much every time we have cornbread I hear this. 

Several years ago, I got tired of trying prepackaged mixes, so I started trying various recipes to make it from scratch. And of course, I couldn't find one that gave me exactly the taste and texture I was looking for, so I pulled ideas from a few different ones and created my very own recipe to which I am now completely devoted. 

Start by combining the dry ingredients in a large bowl. 

In a large measuring cup, thoroughly blend all the liquids, then pour into dry ingredients and stir to combine.

Pour batter into pan of your choice. I prefer to use my silicon loaf pan because a) I don't have to oil it first, and b) I like the shape of the finished cornbread - just the right height to be nice and moist inside with a tender-crisp crust.

Bake at 400* for 20-30 mins or until the crust turns golden brown and begins to crack, and a toothpick inserted in the center tests clean. Turn out onto a cooling rack or directly onto a board.

Allow to cool slightly before slicing, but please do enjoy while warm to experience love at first bite. 

Keep leftovers in an airtight container, and refrigerate if kept more than one day as the 'buttermilk' will make it more apt to spoil. Leftovers make beautiful toast - so nice and crunchy. If you happen to also have lemon curd, the combination is absolutely heavenly!

Cornbread
1 cup all-purpose flour
1 cup cornmeal
1 tsp salt
2 tsp baking powder
1 cup 'buttermilk' (6 oz coconut milk yogurt plus 2 oz rice milk, or your alternative)
1 egg
1/3 cup olive oil
2 Tbsp honey

Preheat oven to 400*. Combine dry ingredients in large bowl. In a large measuring cup, thoroughly blend all liquids. Pour liquids into dry ingredients and stir to combine. Pour batter into loaf pan (prepared with oil if not silicon) and bake 20-30 mins until top is golden brown and toothpick tests clean when inserted into center of loaf. Turn out and allow to cool slightly before slicing. 

Enjoy!                                            

Sue

Tuesday, July 23, 2013

Inside Out Chocolate Chip Cookies

These cookies were so very chocolaty and chewy and soft and oh so delicious! My husband and toddler loved them! 
I first saw these cookies on one of my favorite blogs- Sally's Baking Addiction. She has some amazing recipes on her site. I have gotten a lot of inspiration from her recipes. I adapted her recipe very slightly and doubled it because my husband and toddler love cookies. Click here to see her original recipe. 

These make nice large, thick cookies so you only really want to bake 8 at a time (unless you have a massive cookie sheet) so they don't form together. Use about 2 T of dough for each cookie.


These are just as soft and delicious as they look. If you like chocolate you will love them. Try them. You won't regret it. Trust me. They are too good not to share, and you may want to share if you don't want to eat them all....
I brought some to our neighbor (who is gladly a recipe tester for my goodies) and she asked me what she was going to do when we move at the end of this week and my homemade goodies are not right down the hall. 


Inside Out Chocolate Chip Cookies
1 C butter, softened
1 C packed brown sugar
1 C granulated sugar
1/4 C milk
2 t vanilla
2 large eggs
1 1/4 C cocoa powder
2 C all purpose flour
2 t cornstarch
1/4 t salt
2 t baking soda
2 1/2 C white chocolate chips
In a med bowl combine cocoa powder, flour, cornstarch, salt and baking soda and set aside. In a large bowl, beat butter on med speed about 20 seconds with electric mixer until creamy. Add sugars and beat until light and fluffy. Add egg, vanilla and milk and beat until combined. Scrape down sides of the bowl. Gradually add the dry ingredients, a third at a time into the wet ingredients, beating on low speed. Stir in the white chocolate chips. Important: You must chill the dough for at least 2 hours before baking.
When you are ready to bake, preheat oven to 350*F. Take about 2 T of dough for each cookie and roll into a ball. Place on parchment lined cookie sheet. Bake no more than 8 cookies at a time on a large cookie sheet. Bake 12 min. DO NOT OVERBAKE. Cookies will appear underdone. They will firm up a bit as they sit and cool. Leave cookies on baking sheet for 5 min before removing to wire rack or towel. While one pan of cookies is baking keep the rest of the dough in the fridge. When completely cooled store in an airtight container.
(Recipe adapted slightly from Sally's Baking Addiction)


Enjoy!                                            

Sandi 

Wednesday, July 17, 2013

Sweet and Spicy Wings

I love wings. Buffalo, Honey BBQ, Asian BBQ, Teriyaki...The list goes on. But I also can't leave well enough alone and like to try new ways to have wings too. We tried these wings for July 4th this year. They were not too spicy, so they were great for my mom who doesn't handle as much spice as she used to.
(Big shout out and thanks to my Dad who was my Grill Master for this festive wing experiment. Thanks Daddy!) 
They were sweet from the orange marmalade, and at times we got a bright orange flavor that stood out over the other flavors. We used Smucker's Natural Orange Marmalade.  The salsa we used was the medium spice level of Pace Garden Pepper Restaurant Style Salsa. It had a very good flavor and was not too spicy. Kind of sweet at first and a little subtle kick at the finish. 
*I have not been compensated in any way for these comments. I just happen to like these products and wanted to share with you. *

If you want your wings to turn out a little spicier, you could use a spicier salsa or add some of your favorite hot sauce. Next time I make these I may try adding a little Sriracha for a little more spice.


In a med sized bowl combine salsa, orange marmalade, garlic powder and ground ginger

 Stir to combine. I used a whisk to make sure the orange marmalade dispersed throughout.

Place wings in a casserole dish large enough to contain them and the sauce

Pour sauce over wings and stir or use your hands to work the sauce around all the wings

 Then place on a preheated grill and let the magic happen

 Pour the sauce into a med saucepan and bring to a boil. Use this to dunk the wings in when you flip them over. 

 Oh my goodness they look good. This is about the halfway point.


Totally making these again. They were so good. Next time I will try making them a little spicier and cooking the sauce before hand to intensify the flavors, cooling the sauce and marinating the wings in the sauce overnight. I'll let you know how it goes when I make them again. 


These wings would be great as an appetizer or party dish. We had them as the main dish for dinner and I make a pasta salad to go with. Check back later for the pasta salad recipe. 


Sweet and Spicy Wings
5 lbs chicken wings
2 16 oz jars Salsa (we used Pace Garden Pepper Restaurant Style Salsa)
1 C Orange Marmalade (we used Smucker’s Natural Orange Marmalade)
1 t  ground ginger
4 t garlic powder
(recipe can be halved if you don’t need this many wings)
Place wings in a large casserole dish big enough to hold them without any falling out. In a med bowl combine salsa, orange marmalade, ginger and garlic powder. Whisk to combine. Pour the sauce over the wings and gently stir the wings and sauce to coat all the wings with the sauce. Cover and refrigerate for a couple hours to marinate. Heat grill and then turn to low heat.  Grill wings on low heat throughout cooking process. Place marinade in saucepan and heat to boiling. Dunk wings in sauce halfway through cooking and put back on the grill to finish cooking. When wings are done dunk in sauce again and place on a serving platter. If you have any remaining sauce, pour over wings on serving platter or in a small dish along side the wings if you like. The total cook time on our grill was about 30 min.
*Depending on how hot your grill runs you may have to adjust your cook time.
*You could also cook these in the oven.

*They turned out very mild. Add some hot sauce or sriracha to the sauce to taste if you want them spicier.


Enjoy!                                            
Sandi

Monday, July 15, 2013

Batter Bread


I love bread. Especially homemade bread. And this bread has the added bonus of being fast and easy in addition to being a crowd pleaser. If you are looking for a tasty and versatile bread with a wonderfully crunchy crust surrounding a soft and chewy interior, then look no further. It took a bit of research sampling a few different no-knead recipes and some tinkering to create this original recipe, and I'm happy to share the love!

Start by combining 4 cups of flour, yeast, sugar, salt, and baking soda in a large bowl. For most batches I use 2 cups white whole wheat and 2 cups all-purpose flour for this step. In a large measuring cup, combine 1 cup of milk (I use rice milk of course) with 1 1/2 cups of hot water - your goal is to have warm liquid to pour into the dry ingredients, and I have found that cold milk from the fridge mixed with hot water from the tap gives me the correct temperature without needing to use the microwave. 

Pour the milk and water mixture into the dry ingredients and use a stiff spatula or your favorite dough blending tool to combine. This should leave you with a moderately thick batter consistency.

At this point you can skip to the final flour addition, or you can take advantage of the blank canvas you have created. I almost always take advantage of the blank canvas. My favorite addition to use for every-day bread is bulgur wheat. When using bulgur, measure 1 cup into a bowl and add 1 cup of hot water before you begin measuring your dry ingredients; this will give the bulgur time to soak up the water so the texture in the finished bread will be chewy rather than full of hard nuggets. Whatever addition you choose, add it to the bowl of batter at this step.

The consistency of the batter at this step allows you to easily stir in your addition to distribute it throughout. 

Add 1 cup of the remaining flour and stir. Now you have a really thick batter consistency, still fills the shape of the bowl without holding any of its own shape.

Now you want to take it slower, add more flour about 1/4 cup at a time and stir. Stop once the consistency reaches a stage that is becoming more of a dough than a batter - that is, it begins to hold its own shape. Another clue that you have added enough flour is that it begins to become more difficult to incorporate with the spatula. The amount of total flour you add will depend on your humidity level as well as what addition or lack thereof you have chosen - I usually need close to the full 2 cups when I add bulgur because of the additional water it soaks up, but less for a drier addition like oats or raisins.

Rub the bottom and sides of your dutch oven with coconut oil (or olive oil or any other cooking oil you prefer) then sprinkle liberally with cornmeal. This will allow the bread to release easily when finished cooking, and also contributes to the crunch of the crust. I recommend a relatively finely ground cornmeal though, as it will not soften at all while the bread bakes. **Do not skip this step, or you will find that your bread becomes thoroughly stuck to the dutch oven while baking, and will be very difficult (pretty much impossible in one piece) to remove**

Then transfer your dough to the prepared dutch oven. This will be easier if you scrape the bowl while holding it over the dutch oven, as it should still be too sticky and unformed to pick up easily. See how it holds itself up from the edges a little, but spreads out more than a formed dough ball would do.

Cover the dutch oven and allow the dough to rise for at least 45 minutes. If you feel like preparing your dough early in the day but are busy and won't be baking until later, it is fine to allow it to sit at room temperature for several hours - you will probably even get a nicer rise the longer it sits.

Preheat your oven to 400* and bake with the cover on for 20 minutes, then remove the cover and bake an additional 15-30 minutes with the cover off until the top crust is golden brown and a skewer inserted into the center of the bread tests clean. The moisture retained with the cover on helps the crust to become nice and crunchy.

When done, immediately turn out onto a cooling rack. I recommend flipping it right side up so the top crust (which is thinner than the bottom and sides) does not soften from the steam it will create.

Try to allow the bread to cool at least a few minutes, so you could comfortably hold it, before slicing to avoid compressing it. See that nice thick crust and the lovely internal texture? Mmmm.

And for my good friends Feliks and Irene, who love it with raisins.

This bread is great when it is fresh, but it also keeps well. The crust will soften when stored in an airtight container, but if you pop it in the oven for a few minutes - right on the rack, don't worry about a pan - it will become nicely crunchy again while the interior remains soft. Or individual slices make amazing toast. If you don't go through a lot of bread, I recommend freezing half of it in a freezer bag as soon as it cools. When you are ready for another fresh loaf of bread, just thaw at room temperature, then pop it in the oven to refresh the crust and warm it up.

Batter Bread
4 cups plus 1 1/2 to 2 cups flour, divided
2 tsp yeast
1 T sugar
1 tsp salt
1/4 tsp baking soda
1 cup milk (I use rice milk)
1 1/2 cups hot water
1-2 cups of your favorite addition   *1 cup bulgur soaked in 1 cup hot water; or 2 cups raisins; or get creative and use any combination of grains and/or seeds and/or fruits that you enjoy in your bread*

Combine 4 cups flour and the rest of the dry ingredients in a large bowl. Mix the cold milk and hot water to obtain a very warm liquid, pour into dry ingredients and stir to combine. Stir your favorite addition into batter. Stir in 1 1/2 to 2 cups additional flour in small increments until batter just begins to show properties of a dough (holding some shape, difficult to stir flour in with spatula).
Oil large dutch oven and dust liberally with corn meal. Turn/scrape dough into prepared dutch oven, cover and allow to rise for at least 45 minutes.
Preheat oven to 400*. Bake with cover on for 20 minutes, remove cover and bake an additional 15-30 minutes until crust is golden brown and skewer inserted into center of bread comes out clean.
Turn out onto cooling rack, flip right side up, and allow to cool slightly before slicing.

Enjoy!                                            
Sue

Tuesday, July 9, 2013

Homemade Taco Seasoning

I admit, I used to buy the prepackaged taco seasoning in the spice isle in the grocery store.  Have you ever actually read the ingredients list and nutrition info on those spice mixes? There is so much superfluous (I think that may be my new favorite word) crap in prepackaged spice mixes, well anything prepackaged really. Not to mention that they are LOADED with TONS of salt. So about a year ago I made my own homemade taco seasoning. I make spice mixes for other things too, but those will be in later posts. There is so much less salt and I know what's in it because I made it. 

This recipe makes enough for 1 lb of meat for tacos. You could also make a whole bunch of it and store it in an airtight container so it's all ready for you when you make tacos or burritos. Or even fajitas if you wanted. I'm working on my own fajita seasoning. 


You'll need dried Oregano, dried Chopped Onions, Ground Cumin, Chili Powder, Paprika, Cayenne Pepper, and Goya Adobo All Purpose Seasoning


Combine all the spices in a small bowl


And stir to combine

Homemade Taco Seasoning
1 T garlic powder
1 t cumin
1 t paprika
1 t chili powder (if you have Mexican Hot Chili Powder it will add a nice little spicy kick)
1 t dried minced or chopped onion
1/2 t dried oregano
1/2 t Goya Adobo All Purpose Seasoning
1/16 t cayenne pepper (add a little more if you like spicy taco seasoning)
In a small bowl, combine all ingredients. Use entire amount for 1 lb meat.
*Or you could make a whole bunch and store in an airtight container and stir before using to re-distribute the spices. Use just about 3 T for 1 lb of meat.


To make Taco or Burrito meat:
Cook meat (ground beef, ground chicken or turkey, chicken chunks etc) until done. Drain off any fat and add spice mix. Stir to combine and add 1/4-1/2 C water. Add more water as needed if you need a little more moisture. Cook for a few min and serve.


Enjoy!                                            
Sandi


Sunday, July 7, 2013

Beef Stew

I guess the time interval between my posts is a pretty good indicator of how much free time I have... I'm finally getting to this beef stew post that I promised two three four days ago. Well, hopefully it's worth the wait, it certainly disappeared fast in my house!

Let's start with the beef. Most grocery stores offer precut chunks of 'stew' beef that will save you prep time, but sometimes I have noticed that these chunks are pretty scrappy - lots of gristle and fat rind. I know it's supposed to be a cheaper cut and stewing it is supposed to make it tender, but I really like to start with meatier chunks. What I did for this stew was purchase a big Chateaubriand steak, which was actually cheaper per pound than the stew beef the store was offering as well as much 'cleaner' and meatier, and cut it into chunks myself. I got more meat for my money, and I really like the Chateaubriand - works great for stir fry or kebabs too, so I end up purchasing this cut frequently when I'm not quite sure what I feel like making for dinner because it is so versatile.

Whatever cut you choose to purchase, spread out the chunks on a cutting board or plate. Sprinkle the beef with lots of fresh ground pepper, a bit of sea salt, some thyme and oregano, and all-purpose flour. Roll the meat around to coat with spices and flour before browning.

And prep whatever veggies you like in your stew. I went with parsnips, carrots, and potatoes for my roots this time, as well as crimini mushrooms, pearl onions, and garlic. I use a bag of frozen pearl onions because I just don't have the time to peel that many onions, and these work just as well. You also want to fill a measuring cup or two with 4-6 cups of hot water to have ready.

Start by heating a large dutch oven over medium-high heat. Add a drizzle of olive oil, 1/3 of your minced garlic, and 1/3 of your beef that has been tossed with the flour and spices. Cook just until meat is browned and remove to a large bowl. Immediately add a cup or two of your hot water to deglaze (this just means you stir all the browned bits into the water, turning it into a lovely broth) then pour the liquid out into the bowl holding the browned meat. Repeat this process two more times with another 1/3 of the garlic and beef and another deglazing each time.

Drizzle a little more olive oil in and add your onions and mushrooms. Stir to pick up any remaining browned bits in the pan as they begin to soften. Add the rest of your veggies and the meat and broth and stir to combine. For a little extra flavor kick, pour in a bottle of good dark beer or an equivalent amount of red wine. Cover and bring to a boil while you preheat your oven to 350*. Stir to make sure nothing is sticking to bottom, replace the cover and put in the oven for two hours.

At the end of the two hours, your flavors will have melded and your broth will have reduced and thickened. You could just simmer this on the stove until it has cooked through, but the flavors will be better if you let the oven work its magic. Trust me, try it and see.

Stir and ladle into bowls. I recommend filling your bowls a few minutes before you are ready to eat because this stew is 'boiling in the bowl' - you can even see the steam in the photo!

I highly recommend serving stew with some kind of bread to sop up the juice. It goes especially well with biscuits.

Beef Stew

2-3 lbs beef, cut into big bite-size chunks
fresh ground black pepper, sea salt, thyme, oregano to taste
all-purpose flour to coat
4-6 Yukon gold potatoes, cut into cubes
3-4 carrots, thickly sliced
3-4 parsnips, thickly sliced *can also use any other favorite root veggies
8-12 crimini mushrooms, cut into sixths
8-12 oz bag frozen pearl onions, thawed
3-4 cloves garlic, minced
4-6 cups hot water
12 oz dark beer or red wine
olive oil for sauteing

Heat a drizzle of olive oil and 1/3 of minced garlic in dutch oven over medium-high heat. Add 1/3 of beef and cook just until browned, remove to large bowl. Deglaze with 1-2 cups of the hot water, pour off into bowl with browned meat. Repeat twice more.
With another drizzle of olive oil, saute onions and mushrooms, stirring to pick up any brown bits left in the pan. Add veggies, browned meat with broth, and beer or wine. Stir to incorporate.
Cover and bring to boil while preheating oven to 350*.
Stir, replace cover, transfer to oven for two hours.
Stir and serve.

Enjoy!                                            
Sue

Cranberry White Chocolate Scones

Scones and coffee or tea. One of the best breakfasts ever wouldn't you say? Oh my. We love scones. And these are so simple you'll be making them all the time. 
I first came across this recipe shortly before Christmas a few years back and decided to make them for our Christmas morning breakfast. Well let me tell you, they were a big hit!
What do you like to make for your family for Christmas morning breakfast?


Combine the flour, sugar, baking soda, baking powder and salt. Then add the butter 

And using your pastry blender (or cris-crossing 2 knives) cut in the butter until the mixture resembles small peas or large crumbs

Add the dried cranberries, white chocolate chips and orange zest and stir to combine

Add the Greek yogurt and buttermilk

And stir just until mixture comes together and dry ingredients are moistened. Dough will be sticky

Using flour to keep your fingers from sticking, shape dough into a ball and place on parchment lined baking sheet. Press dough down into an 8” round

Cut into 8 wedges but don't separate the wedges. With a pastry brush, brush top of dough with 1 T of milk. You may not need it all. In a small bowl, combine 1 T sugar with 1/2 t orange zest and sprinkle over dough.

And bake for 15-20 min until edges start to turn a nice light golden brown

Then take them off the baking sheet (no picture of that....oops) and let them cool for 5 min before cutting into wedges and serving

I like mine with a cup of coffee or tea

Oh my goodness. Don't they just look yummy?

Oh. And these are approved by our toddler too!


Cranberry Orange White Chocolate Chip Scones
1/4 C butter, softened
1 3/4 C all purpose flour
1/4 C granulated sugar
1/4 t baking soda
2 t baking powder
1/4 t salt
1/2 C dried cranberries
1/2 C white chocolate chips
1 t orange zest
1/2 C vanilla Greek yogurt
1/3 C buttermilk
1 T milk
1 T sugar
1/2 t orange zest
Preheat oven to 375*F. In a large bowl combine flour, 1/4 C sugar, baking soda, baking powder and salt. Cut in butter with a pastry blender until butter breaks down to the size of small peas. Stir in dried cranberries, white chocolate chips and 1 t orange zest. Then add the Greek yogurt and buttermilk and stir just until mixture comes together and dry ingredients are moistened. Dough will be sticky. Using flour to keep your fingers from sticking, shape dough into a ball and place on parchment lined baking sheet. Press dough down into an 8” round. Cut into 8 wedges but don’t separate the wedges. With a pastry brush, brush top of dough with 1 T of milk. You may not need it all. In a small bowl, combine 1 T sugar with 1/2 t orange zest and sprinkle over dough. Bake for 15-20 min until edges start to turn light golden brown. Remove from baking sheet immediately and let cool for 5 min before cutting into wedges.
(slightly adapted from Pillsbury Annual Recipes 2006)


Enjoy!                                            

Sandi