Tuesday, June 9, 2015

Happy 2nd Birthday to us! Banana Creme Pie anyone?

Happy Birthday!!

Happy 2nd birthday to us! On June 7, 2013 we posted our first posts on this blog and have had a great time with it. We have had quite a long absence, what with both of us raising toddler boys and life being super busy. We've still been cooking and baking and occasionally taking pictures of our goodies, life just hasn't allowed us to share them with you all. Believe me, I have loads upon loads of recipes to share with you....

We have both moved to different locations within our absence and are at least on the same side of the country now, though still several hundred miles apart with me in Maine and Sue in Georgia. I hope to have more of a presence on the blog now that things seem to have slowed down slightly, at least for now anyway.

My little boy is now not so little. He's 3 1/2 ft tall and 36 lbs.....he'll be 4 in October.....where has the time gone and how did he get so big?! Every time he sits in my lap I think, my gosh he used to be so little....
taking a break from playing in the dirt 

 no dirt....but he's got his "dirt toys"

loves the slides at the playground


I thought for my first post in such a long time, I would post a recipe I recently made for my husband's birthday. He loves, loves, LOVES banana creme pie. It might be a toss-up whether this pie or chocolate creme pie is his favorite. I am honestly not a huge fan of banana creme pie (though I like bananas) and would prefer the chocolate creme pie, but it's his birthday so he gets a birthday pie this year rather than cake. And since I don't care for banana creme pie, he basically gets a whole pie to himself, aside from the tiny bit our 3 yr old will eat. This recipe is from his grandmother, who graciously gave me the recipe a couple years ago. Graham cracker crust works the best with this recipe. You can use a store bought one or make your own, I used store bought this time to save a little time.

 Beat your egg and set aside

 In a med saucepan combine the butter, flour, sugar and milk

 Cook and stir until butter melts

 Temper the egg-
if you have never done this before, pour a little of the hot mixture into your egg while you whisk so as not to scramble your egg. Then return this tempered egg to the saucepan and whisk to combine. 

 Cook and stir until the mixture thickens and resembles a pudding consistency

 Slice your banana 
(I used a banana and a half)

 Place a single layer of sliced banana in the bottom of your pie shell

 Pour in your pudding and top with another single layer of sliced banana

And there you have your pie. Now place your pie in the fridge to cool completely. 

Make your sweetened whipped cream. I like mine a little past soft peaks. 


And top the pie with whipped cream

And now enjoy it......

And here's the recipe :)

Gigi's Banana Creme Pie

3 T butter
3 T flour
1 C packed brown sugar
1 C milk
1 large egg
1 t vanilla extract
2 bananas, sliced (you may not need all of it)
1 graham cracker pie crust
Sweetened Whipped Cream**

In a small bowl, beat your egg and set aside. In a med sized saucepan combine butter, flour, sugar and milk. Cook and stir until the butter melts. Temper the egg and add to the sugar mixture in the saucepan. Cook and stir until the mixture thickens to the consistency of pudding. Remove from heat and stir in the vanilla. Let cool until you can stick your finger in it and hold it there, so as not to cook your bananas.

Place sliced bananas in a single layer on the bottom of your pie crust. Pour your brown sugar pudding mixture into pie shell and spread to sides. Now top off your pudding with a single layer of sliced bananas. Let your pie cool in the fridge until the pudding cools down completely. Once the pie is completely chilled, whip your cream and spread on top of your pie.


**Sweetened Whipped Cream**
1 pint whipping cream
3-6 T powdered sugar (depending on how sweet you like it)
1 t vanilla extract

Beat cream, sugar and vanilla in a large chilled bowl on high speed until soft peaks form.


Enjoy your pie and have a great day!

Sandi


Thursday, April 17, 2014

Tortizza - a healthy pizza for toddlers and the young at heart!


This is really more of an idea that I wanted to share than an actual recipe, but since time has gotten away from me for the last couple weeks again, I decided to go for it. Do you ever have those days when your best laid plans just don't pan out, and you are left wondering what to feed your little one(s)? Well I certainly do, and this idea came to me on one of those days. I didn't make it to the grocery store, I had run out of time to make anything substantial, and all I had that was quick was frozen blocks of puréed veggies. Then I noticed that I had a couple whole grain tortillas, shredded rice cheese, and ham as well, and I decided to try out pizza of sorts for my little guy and see what he thought. 

I popped a tortilla in the toaster oven while I thawed a cube of puréed broccoli. Once the broccoli was soft I spread a nice thick layer over the tortilla, sprinkled on some shredded rice cheese and topped with a bit of ham, and popped it back into the toaster oven to melt the cheese just a little and warm the ham. You could also heat this in a sauté pan on the stove as you would a quesadilla if you do not own a toaster oven, just don't flip it! My little man is still in the phase where he will take a bite of something if I hold it, but if I give him something that I intend for him to take bites of, he will just try to stuff it in his mouth whole. So I cut it into little bite size cubes and gave him a few of those at a time. He absolutely loved it! 

This is a really versatile 'recipe' that could be made with just about any purée that you have on hand, or if you are far enough past the purée stage that you no longer keep them even for quick travel pouch use, just mash soft cooked veggies until you can spread them. And, just as you would customize toppings for a regular pizza, you could top these with whatever you have around. You might even get lucky with a 'picky' eater, and get someone to eat something they might not normally want, simply because it's a new approach. 

For those of you who really need a recipe to work from, here ya go:

Tortizza

Whole grain tortilla, as many as you have mouths to feed
Puréed or mashed cooked veggies, a few tablespoons per tortilla (depending on diameter), enough to cover tortilla fairly thickly
Shredded cheese or substitute (I actually tried this again with some crumbled goat cheese and it was even better!)
Toppings: diced or shredded meats or additional veggies, use what you or your littles like

Spread purée to cover tortilla in a fairly thick layer. Top with cheese and any other toppings. Heat in toaster oven or sauté pan just until warm, longer to achieve crisp crust if age appropriate. Cut into bite size pieces for toddlers, or slice into triangles as appropriate. 

Enjoy!                                            
Sue

Monday, March 31, 2014

Sour Pickles

If you're anything like me, you've stopped to browse through the pickle section of your grocery store at least once hoping to see something new, interesting, and hopefully tasty, that doesn't contain a bunch of high fructose corn syrup and yellow dye. I'm serious about that, if you've never read the ingredients on your pickle jar, it may shock you to learn that most of the big brands feel the need to dye their pickles. This may or may not bother you, either way, I have come to the conclusion that most of those pickles are over sweetened for my tastes. There are a handful of small-batch pickle producers that make a good product, but when I'm in the mood for a good sour pickle, I really like to make my own. 

Don't be intimidated by this idea, it is actually incredibly simple! This pickle recipe includes only four ingredients that you probably already have in your cupboards, in addition to fresh cucumbers and a little water. 

I grew up on these pickles, and it makes me smile every time I use my Gram's cookbook to make them or anything else. It also makes my mouth pucker just to think about them, let alone when I open the jar and smell that lovely brine! And to be honest, I'm getting a good chuckle right now imagining how many of my family members reading this are feeling that pucker and about to go make some pickles now too! 

Start by mixing the dry mustard, sugar, and salt with the cider vinegar and water. Here I have the dry in one jar and the liquids in another just to show this step. Wash and slice your cucumbers if you want them to pickle quickly, just a few hours in the brine will put flavor into the slices. Leave them whole if you prefer, but you'll have to wait at least over night for the flavor to get into whole cukes. Also, if you want whole ones, make sure you have jars large enough to hold the whole cucumbers! I wanted my pickles now so I sliced the cukes. Also, I couldn't seem to find the large jar I thought I had, so I ended up splitting the batch into two pint jars. 

Fill your jar or jars with cucumber slices or whole cukes, and pour in the brine to completely cover them. Ensure a good seal on the jars and refrigerate. The brine will separate a bit as gravity does its work, you will see clumpy sediment areas of the mustard mixture and the fluid will look a bit more clear, just shake the jars and it will all come back together. 

These pickles were in the brine for only about three hours before I couldn't wait any longer, and they already had plenty of flavor. Of course, the longer they sit, the stronger the flavor will become. Also, I managed to save some for a couple weeks to see how long they would stay crisp, and they were still not soggy floppy messes like some inferior purchased pickles I've experienced. Another nice thing about this brine is that after you've eaten all your pickles, just wash and slice a few more cucumbers and add them to the brine jar to make more! 

And here's the recipe so you can make your very own! 

Sour Pickles

Fresh cucumbers (about 6, depending on size of cukes and size of your containers)
          (for best results use the small pickling or Persian cucumber variety)
2 Tbsp dry mustard
2 Tbsp salt
3 Tbsp sugar
1 1/4 Cups apple cider vinegar
1/2 to 3/4 Cup cold water 
          (if you like the taste to be quite sour, use smaller amount of water, 
           for a slightly mellowed but still nicely sour flavor use the larger amount)

Wash and optionally slice cucumbers and place in resealable glass jar or jars. Combine all brine ingredients and pour into jars to completely cover cucumbers. Refrigerate and wait a few hours for sliced cucumbers or over night for whole ones to become pickled. Use a fork to fish the pickles out of the jar and consume with alacrity. 

Enjoy!                                            
Sue

Thursday, March 20, 2014

Carrot Oatmeal Raisin Cookies

Wow, time really flies when you have a toddler! I feel like just yesterday I was telling you all how my holiday projects were finished so I could spend some more time blogging... Then so much more started happening around here that my plans flew right out the window, and here it has been over a month since I've posted again! Now I've completed another big project and I'm really appalled at the number of posts that I've back-logged for myself. This time instead of trying to play catch up and just ending up with more new post ideas piling up, I'm deciding to start with new material and work my way back to revisiting some of my older ideas as I get back into the swing. Alright, enough about me, let's get to the reason you're reading this post - cookies!


I was shredding some carrots to make egg rolls a few days ago (if you haven't tried them yet, here's a link to that recipe for you. I know, you're here for a cookie recipe, but trust me on this one...) and as I was using my Kitchenaid attachment to avoid shredding my fingers, which I always do when I use a hand grater, I was admiring the growing pile of pretty orange and yellow shreds. I started thinking to myself that it might be nice to make some muffins or something with these lovely carrots, so I shredded an extra pile of them and tossed them in a container in the fridge to consider my options while I finished the egg rolls. 

See what I mean? They're just begging to be made into something nice!

The next day, I was all set to start making muffins when inspiration struck: what if I made a cookie?! Something with oats, a little breakfasty, not really sweet, something that would make a great healthy snack during my husband's long work days (that he would also enjoy eating)... So I started searching for recipe ideas. The one I found on the Quaker website was closest to what I was looking for, but I still tweaked it a little to really get what I wanted. I asked my husband to really critique them while he ate the first batch, because I had enough carrot already shredded to make a second batch, and I wanted to know if there was anything he'd like me to do differently. The verdict: great texture, perfect amount of raisins, delicious flavor. There wasn't anything he would change, except maybe sprinkle a little cinnamon sugar on a few to see how they were as more of a dessert. So I'm adding this one to the list of 'make often' and I hope you like it too!
  
Start by putting your raisins in a bowl and covering them with hot water. This will allow them to rehydrate and plump while you get everything else ready. Here's a side by side view of why this is a good idea:

Combine all the dry ingredients in a bowl and set aside. 


In your mixing bowl, cream together the honey and shortening of your choice (I use coconut oil). 


Beat in the egg, vanilla, and applesauce, then add the carrots and mix well. 


Stir in the dry ingredients all at once, mixing just until combined. 


Drain the raisins, and fold them in. 


Drop by spoonfuls (or use a cookie scoop like I do) onto a parchment lined baking sheet and spread to your desired shape. They should puff just a little, but the cookies will not spread out as they bake, so whatever shape they go into the oven is the shape they will come out.


Bake in a preheated 350* oven for 10-12 minutes, until edges are just starting to brown and center is set. 


Half of the second batch got a sprinkle of cinnamon sugar on top just before baking, here they are after:


Allow to rest on the pan for a few minutes before transferring to a rack to cool completely. Store in an airtight container. These cookies are at their best when eaten fresh, within three days of baking. Hubby's final verdict was that the first day, they are perfect without the cinnamon sugar, and the third day they are better with the cinnamon sugar. 

And here's the recipe for you:

Carrot Oatmeal Raisin Cookies

2 Cups old fashioned rolled oats
1 Cup whole wheat flour
2 Tbsp ground flax seed meal
1 tsp baking soda
1 tsp baking powder
1/2 tsp salt
1/2 tsp ground cinnamon
1/2 tsp ground nutmeg
1/2 tsp ground ginger
1/4 tsp ground cloves
1/4 Cup honey
1/4 Cup coconut oil (or your preferred shortening)
1 egg
1/3 Cup unsweetened applesauce
1 tsp vanilla
1 Cup shredded carrot
1/2 Cup raisins

Put raisins in a small bowl with enough hot water to completely cover them, set aside. 
Combine all dry ingredients in a medium bowl, set aside. 
In a mixing bowl, cream together honey and coconut oil. Beat in egg, applesauce, and vanilla. Add carrots and mix well. Add dry ingredients all at once, mix just until combined. Drain raisins, then fold them into dough. 
Preheat oven to 350*. 
Drop dough by spoonfuls or cookie scoop onto a parchment lined baking sheet, and spread to desired shape (cookies will not spread while baking). Bake 10-12 minutes, until edges are just starting to brown and center is set. Allow to cool a few minutes on pan before transferring to a rack to cool completely. 
Store in an airtight container. Cookies are best within three days of baking. 

Enjoy!                                            
Sue

Friday, February 14, 2014

Happy Valentine's Day!


Chocolate has to be my favorite Valentine tradition, and what food blog would be complete without a little participation? Since hubby loves my chocolate covered blueberries so much, and I happened to find some really nice blueberries a few days ago, I decided to surprise him with a batch. And since it's Valentine's Day, I wanted to make them really special, so I made a bowl for them out of chocolate covered pretzels!


You can see the step by step instructions/recipe for the chocolate covered blueberries here. For the pretzel bowl, follow the same method used for dipping the blueberries, and just set the dipped pretzels onto a plastic-wrap-covered upside down bowl of the size you desire, ensuring there is plenty of chocolate between the pretzels to keep them solidly stuck together. Allow to set completely before removing from the bowl and filling - refrigerate for a faster set. (Sorry I don't have photos of this process, I was trying to get this project completed quickly this morning so I'd have time for it to set to make it to hubby's lunch break for his surprise)! 


I hope you all have a wonderful Valentine's Day! More new recipes are on their way to you soon!

Enjoy!                                            
Sue

Thursday, January 30, 2014

Chicken Creole Soup

I too have been missing in action for a while. Things have been crazy around here since Thanksgiving. And boy has it been super cold here in New Hampshire! I can't wait for warm weather! 

I don't think it's going to slow down for a while, as I have begun taking online classes at my local community college. I have entered into the Medical Coding Certificate Program and should be able to complete all my classes in just over a year. As a result, I will more than likely have less time to devote to blogging. I really love sharing recipes with all of you, and I plan to blog as much as possible while taking classes, but it may be few and far between until I have school breaks. But I figured since I have a few min right now while my son is watching cartoons, I would share a recipe for one of my families favorite soups. 

I have made this soup a number of times, and each time it is perfect. Before I had our son, I made this soup a little spicier. But in the hopes that he would eat it, I went a little easy on the spice this time. The recipe as follows is the way I made it last night. It has a subtle spice (feel free to make it spicier if you want), but it's not too spicy. 

Also, as a little note, this makes A LOT of soup. There are only 3 of us, so after we had dinner last night I had two 6 C buckets and a 3 C bucket leftover. Now that is a lot of soup! You could totally cut this in half if you don't want that much soup, but we like to put leftovers in the freezer for a quick go-to meal when there is not much time to pull a meal together on a crazy hectic day. If you do choose to freeze some, when you reheat it in a pot, you may want to add some water or chicken stock to it to make a soup consistency again. We like to serve this with nice crusty rolls to complete the meal. 

I apologize for the lack of photos. I was trying to pull this together quickly with a toddler who likes to "help". 


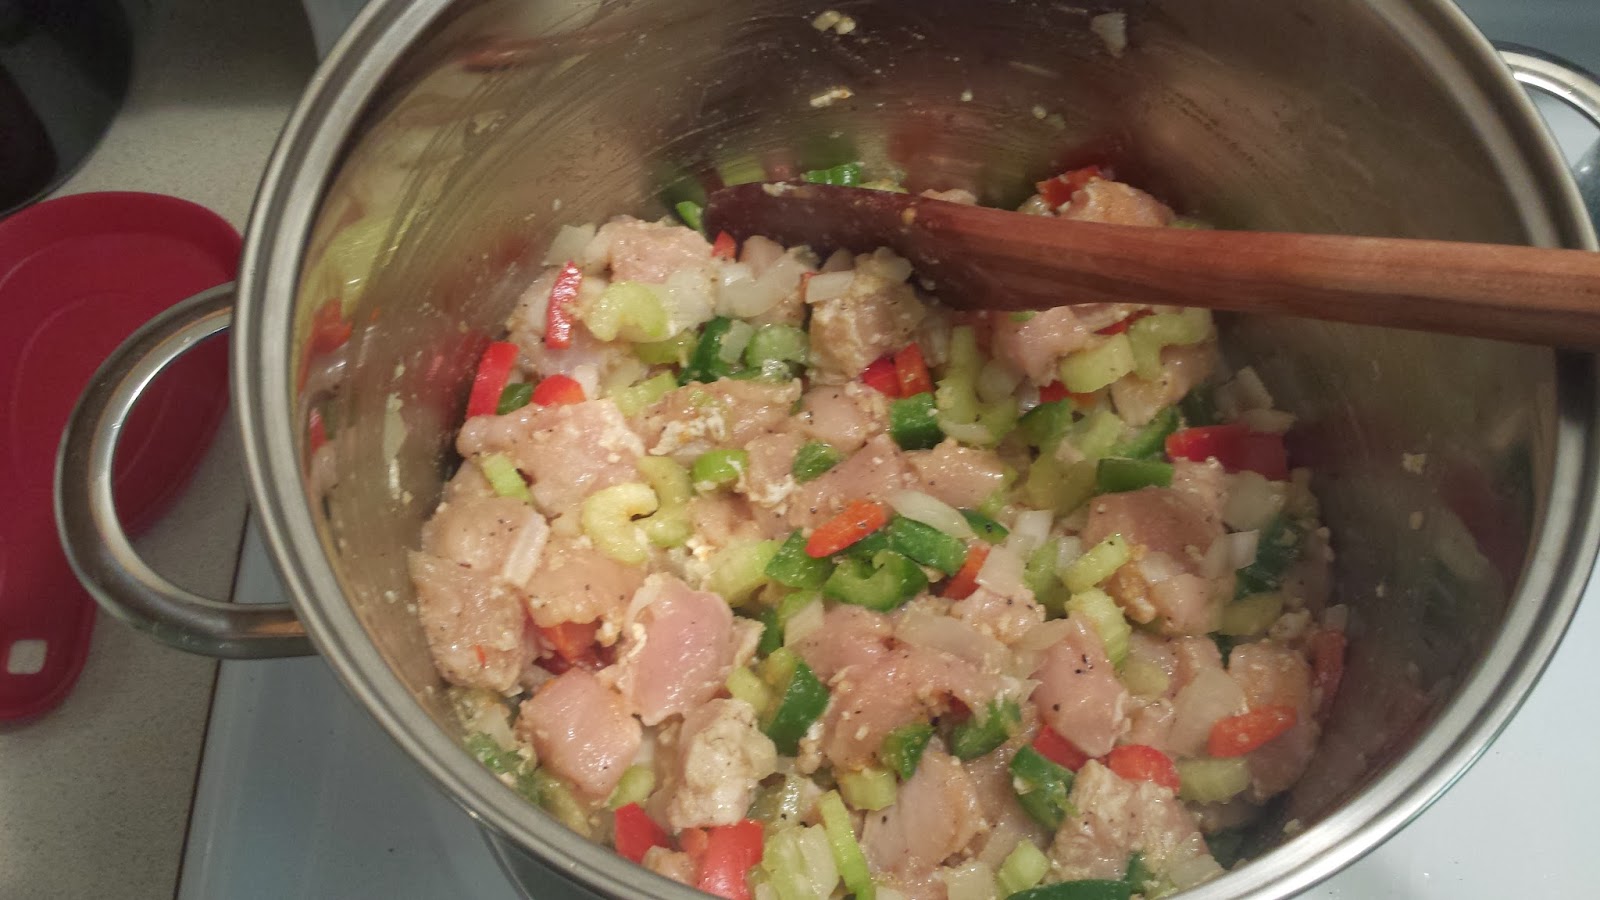
This is the first stage of the process. Saute the onions, peppers, celery, minced fresh garlic, and chicken in a couple tablespoons of olive oil with a little salt, pepper and garlic powder. I know, your thinking fresh minced garlic AND garlic powder?! Yup. We like garlic in this house. If you don't like garlic that much, feel free to add less or leave it out or use only one type of garlic. 
Make sure you start with a large enough pot for this.....The first time I made this soup I had to switch pots halfway through because I didn't have enough room for the liquid.... The pot I use for soups is a large stainless steel stock pot. It is large enough to fit a whole turkey carcass for making stock.  


And this is actually one of the leftover buckets that we put in the freezer. But the time the soup was done, our son was antsy and ready for dinner, so I forgot to get a picture of it in a pretty bowl. 
The rice soaks up a lot of the juice in the soup, so feel fee to add less rice or more liquid. 

And here's the recipe. 

Chicken Creole Soup
(adapted from Betty Crocker)
2 T olive oil
1 med onion, chopped
2 large stalks celery, chopped
1/2 each green and red bell pepper, chopped
2 t finely chopped garlic
2 1/2 lb boneless, skinless chicken breasts or thighs, cut into 1” pieces
Salt, pepper and garlic powder to taste
1/4 C flour
2 14 oz cans diced tomatoes, undrained (I used 1 can of jalapeno diced tomatoes and 1 can plain diced tomatoes)
4 C chicken broth or stock
3 C water
1 1/4 C uncooked regular long grain white rice
1/4 t cayenne pepper (add more if you like it spicy or even add hot sauce)
2 dried bay leaves

In 5-6 qt large dutch oven or stock pot, heat olive oil over med-high heat. Add onions, celery, bell pepper, garlic and chicken sprinkle with salt, pepper and garlic powder to taste; cook 7-9 min, stirring frequently, until onion begins soften. Stir in flour. Cook 5-6 min stirring constantly until flour begins to turn light brown. Stir in remaining ingredients. Heat to boiling. Reduce heat to med-low. Cover and cook 15-20 min stirring occasionally, until rice is tender and chicken is no longer pink in center. Remove bay leaves before serving. Taste and add salt to taste, if needed.
We serve this with warmed crusty rolls.


Enjoy!                                            

Sandi 

Tuesday, January 28, 2014

Oatmeal Whole Wheat Pancakes

I have a handful of post drafts that I have begun but not managed to complete, as well as additional photos that I have yet to even begin drafts for. I'm working on it... So when I heard that today was National Blueberry Pancake Day, and since I found these pretty blueberries yesterday, I thought it was appropriate to celebrate with blueberry pancakes for breakfast!

Making pancakes from scratch really is quite easy, and all it takes to make it as quick as using a boxed mix is a little preparation ahead of time - you can mix up the dry ingredients and keep them in an airtight container. In my opinion, making anything from scratch really is worth the small amount of extra effort.

These particular pancakes have more texture and more 'stay with you' filling power than your traditional white pancake. They also freeze well, and are excellent reheated in the toaster (although usually I do this with them when I haven't added blueberries, so be cautious of the blueberry juice leaking if you do not have a toaster oven). 

Start by combining your dry ingredients in a large bowl and your liquid ingredients in a measuring cup or small bowl. 

Stir together the dry ingredients, then add the whisked liquids all at once, and stir just until combined. If the batter is too thin, stir in a small amount of additional all purpose flour. For this batch, I used ~3/4 cup total all purpose flour. 

Pour or spoon the batter onto a preheated griddle or skillet (I use a nonstick griddle, but if you use a different type of skillet you will probably need to use oil or butter to keep the pancakes from sticking). Sprinkle fresh blueberries over the top of each pancake (or another fruit, or just leave them plain).

You can see the very edges starting to look dry in the above photo, and a couple bubbles popping over the surface. When this effect spreads over more of the surface it's ready to flip.

Allow the pancakes to finish cooking on the second side, and then flip them blueberry side up to serve.

And here's the recipe:

Oatmeal Whole Wheat Pancakes
1 cup whole wheat flour
1 cup old-fashioned oats
¼-1 cup all purpose flour (to desired consistency)
1 tablespoon brown sugar
1 teaspoon baking soda
1/2 teaspoon baking powder
2 eggs
2 cups milk or buttermilk (or your favorite milk alternative)
1/4 cup olive oil
Fresh blueberries or other fruit (optional)

Combine dry ingredients in a large mixing bowl (start with the smaller amount of all-purpose flour). Store in an airtight container until you're ready to make pancakes. Whisk the eggs, milk, and oil in a measuring cup or small bowl, and stir into dry mix just until combined. Stir in additional all purpose flour as needed to reach the correct batter consistency. 

Pour or spoon the batter onto a preheated griddle or skillet (I use a nonstick griddle, but if you use a different type of skillet you will probably need to use oil or butter to keep the pancakes from sticking). Sprinkle fresh blueberries over the top of each pancake (or another fruit, or just leave them plain).
When bubbly and starting to look dry, flip pancakes and allow to finish cooking on the second side. Serve fruit side up. 

Store leftovers in an airtight container in the fridge, or freeze for a conveniently fast and delicious breakfast or snack. 

Enjoy!                                            
Sue