Sunday, September 29, 2013

Apples up to my eyeballs!

We have been super busy at my house. Getting into a new routine at the new place. We've been in the new place for 2 months now and things are going well. A few sleep deprived nights, and as a result exhausted days, as our toddler who is about to turn 2 has decided not to sleep through the night again. 

We recently went apple picking at Shelburne Orchards in Shelburne, VT. We LOVE picking our own apples.  There is just something so satisfying and fun about picking them yourself instead of buying them in the grocery store. Shelburne Orchards has a really great selection of Pick Your Own fruit. Picking our own apples there is one of the reasons that Vermont is our favorite New England state. 

 I love fall. I love the way the air smells so clean and fresh and crisp and the colors of the leaves changing to red, orange and yellow. Now, I am really a summer kind of girl. I love the beach and I love lots and lots of sunshine and warmth. But fall holds a special place in my heart too. 


We had really great weather the day we went apple picking. It was cool, but not too cold. It was spectacularly sunny. And we actually went on a weekday so there was hardly anyone around us while we were picking.


Don't they look delicious and pretty?

Don't you just want to reach into the picture and take and apple?

This is what 155 lbs of McIntosh apples looks like.....yes, we picked 155 lbs of apples....only half of them went home with my husband and I. The other 2 bags were my mom's. 

Our toddler was having a great time.


He was a really great little helper. He was having a great time taking apples from us and putting them in the bags.


And picking apples himself.

And eating them....I think he ate 3 apples that day!
 Isn't that just the most adorable little face?


So pretty. So crisp, juicy and slightly tart. Just delicious. 


Not only are the apples beautiful, but they had a really beautiful pile of pumpkins. 
Our toddler picked out 2 little pumpkins. He continually moves them around to different positions in our living room. 

This is the biggest of the 2 pumpkins he picked.

And the little baby one he picked.

Now the little one is in the bag.


Did I mention I love fall? Orange and green are my favorite colors. 

Happy Fall! 


More posts to come with LOTS of apple recipes. I have been apple recipe testing since we got home. I still have TONS of apples left to make things with. Anyone have any apple recipe you'd like to see me make? 

*I have not been compensated in any way for these comments. I just happen to love this orchard and wanted to share with you. *


Sandi 


Friday, September 27, 2013

Peach Oat Wheat Muffins

What to do with a handful of ripe peaches... Hmm, not enough for pie... I bet they'd be good in muffins! If I push them through the baby food mill I should have something similar to the texture of mashed bananas (and I won't have to peel them first) that should work! On a side note - this baby food mill is one of my new favorite gadgets, I think I will keep it around even after baby doesn't need it anymore...

I especially love to have fresh hot muffins for breakfast, but I find lately that it just takes too long to get them ready for breakfast. Even though one of the great things about muffins is how quickly they come together, with my newly mobile little guy cruising all over the place it isn't happening for me. So I decided to try getting everything ready the day before I wanted muffins, and then just stir and bake for speedy breakfast.

I used a mason jar for the liquids, and combined the dry ingredients in a bowl that I could cover. You could really use any airtight container for the liquids, but I happen to always have mason jars on hand, and they feature the added bonus of measurement lines so I didn't have to use separate measuring cups.

Combine flour, oats, brown sugar, baking powder, salt, cinnamon, and nutmeg in a resealable container or bowl that you can cover with plastic wrap; set aside. Combine peach puree, (rice)milk, egg, and vanilla in a mason jar or other resealable container (for easiest method, use a container that seals well so you can just shake it to combine rather than needing to whisk) and refrigerate until you're ready to make breakfast.

Then, in the morning, preheat your oven to 400* first thing. Stir together the dry ingredients, shake your jar of liquids and pour it in, then stir everything until just combined. Spoon into your muffin pan (greased or papered if you need, my silicon pan doesn't need...) and bake for 20-25 minutes until tops are golden brown and a toothpick comes out mostly dry. A few moist crumbs on the toothpick are ok with these muffins, because the peach puree will stay moist even when they are fully baked. Remove to a rack and enjoy your fresh hot muffins for breakfast!

I really love to use oats in muffins for the taste as well as the added texture. These didn't seem to have as much peach flavor as I expected, but they were quite good!

And here's the recipe:

Peach Oat Wheat Muffins
1 1/4 C whole wheat flour
1 C old fashioned oats
1/4 C brown sugar
2 tsp baking powder
1/2 tsp salt
1/2 tsp cinnamon
1/4 tsp nutmeg
1 1/4 C peach puree (you can supplement with unsweetened applesauce if you are a little short)
1/2 C (rice)milk
1 egg
1 tsp vanilla

Combine dry ingredients in a med-large bowl, cover and set aside. Combine peach puree and other liquids in a mason jar or other resealable container, refrigerate until ready to use.
Preheat oven to 400* and prepare your muffin pan as needed. Stir dry ingredients; shake or whisk liquids and pour into dry mix; stir just to combine. Spoon into muffin pan and bake 20-25 minutes, until golden brown and a toothpick comes out mostly dry. Remove muffins to a rack to cool. Store leftovers in airtight container.

Enjoy!                                            
Sue

Wednesday, September 18, 2013

Roast Pork Tenderloin


Well, my husband's schedule has gone back to keeping him at work later most nights, so I get to cook dinners again! Not that I don't enjoy when he cooks, but I do miss cooking when I don't do it for a while. This dish is nice because you can prepare most of it early in the day, or even the night before if you like, to decrease the time it will take to get dinner ready. For that reason, however, you'll have to excuse my photos if they are a bit blurry, as I was wearing my little helper on my back while doing the prep work - he likes to kick his feet if I hold still to take photos ("Giddyup Mama!") 

First combine your garlic and spices in a mortar.

And use the pestle to crush and macerate them.

Add olive oil and continue to grind the mixture into a thick paste. If you don't have a mortar and pestle, you can use a food processor or just a knife and cutting board. The cutting board method will take a bit longer and will probably not give you a paste so much as a spice rub, and you'll use the olive oil separately, but if it's all you have it will still taste good!

Rub the spice paste onto all surfaces of the meat. I used two tenderloins because I wanted leftovers, but you could use just one or a different cut if you prefer. You can continue to the cooking stage now, or wrap the meat and refrigerate until you are ready to cook.

Preheat oven to 425*. Heat a drizzle of olive oil in a cast iron (or any oven-proof) skillet, and sear the meat on all sides.

Remove the meat and saute onion slices until fragrant. Stir them around with a wooden spoon during this step to pick up the browned spices that stayed in the skillet.

Return the seared meat to the pan on top of the onions and roast in the 425* oven for 10-15 minutes per pound.

Transfer meat to platter and allow it to rest while you deglaze the pan. Return the skillet to the stovetop over med-high heat and pour in about a cup of liquid (water works fine but if you'd like to kick it up feel free to use wine, or I bet it would be great with apple cider...). Stir with wooden spoon to loosen any more browned bits, allow liquid to simmer down if you want it thicker.

Pour your lovely brown onion jus (or gravy if you let it thicken) over the meat to serve.

And now for the recipe:

Roast Pork Tenderloin
1 or 2 pork tenderloins
5-6 garlic cloves
1 Tbsp dry rosemary
2 tsp dry mustard
1 tsp sea salt
1 tsp fresh ground pepper
1 Tbsp olive oil, plus a drizzle for searing
1 large onion, sliced
1 cup water or other liquid

Macerate garlic and spices with mortar and pestle, add olive oil and continue to grind into a thick paste. Rub spice paste onto all sides of meat, wrap and refrigerate until ready to cook.
Preheat oven to 425*. Heat olive oil in cast iron skillet and sear meat on all sides. Remove meat and saute onion slices until fragrant, stirring with a wooden spoon to pick up browned spices from skillet. Return meat to skillet on top of onion, roast in 425* oven for 10-15 minutes per pound.
Transfer meat to platter to rest. Return skillet to stovetop over med-high heat. Pour in water or other liquid, stirring to loosen brown bits from skillet. Allow to simmer down to thicken if desired. Pour onion jus/gravy over meat to serve.

Enjoy!                                            
Sue

Saturday, August 31, 2013

Pumpkin Chocolate Chip Cookies

I feel like a stranger here, it's been so long since I've been able to post! Hubby has been enjoying doing most of the cooking lately while I get our little one ready for bed, and I am not allowed to use any of his dishes for blog posts (because they are 'not good enough' despite my enthusiastic enjoyment and praise, though I secretly believe he just doesn't remember everything he puts in them...) so even after returning from vacation and getting used to the additional mobility of our son, I just haven't had the material for new posts. Well, now I've finally taken advantage of a longer afternoon nap and whipped up a batch of cookies to satisfy both my baking withdrawal and my need to blog!

I use my mom's recipe for these pumpkin cookies, with just a few tweaks - I've decreased the sugar and oil in them as well as switched out the all-purpose flour for white whole wheat. The result - a healthier cookie with the taste and texture so similar to the original you wouldn't know if I didn't tell you; in fact I shared these with our neighbors and neither they nor my husband could tell, even after I told them. 

Start by whisking together the pumpkin, sugar, egg, and oil in a large bowl. Stir together the baking soda and (rice)milk in a small dish and whisk that in as well. In a separate bowl, sift together your flour, baking powder, and cinnamon. You can use either fresh roasted and pureed pumpkin or canned pumpkin, I've done both and the cookies turn out very similar either way, so I prefer to save my fresh pumpkin for pie because I really do notice a difference there. Now I can't wait for pumpkin season....

Stir the flour mixture into the pumpkin mixture in a few batches so it is easier to incorporate. Use a spatula for this process, a whisk will quickly become a hindrance (I absentmindedly attempted this with a whisk once, and quickly realized my mistake...)

Then stir in your vanilla extract and chocolate chips. I love mini chips - especially since I make little bite-size cookies, but you can use your favorite chips. I bet these would be good with cinnamon chips too if anyone either doesn't like or can't eat chocolate... or wants to combine the two... Please let me know how it turns out if you try it!

Preheat your oven to 375* and drop dough by cookie-scoop or spoonfuls onto a parchment lined cookie sheet, leaving space between cookies for growth during baking. Don't bother getting out a ruler to place them, just leave about as much space as the height of your scoops - this is a fairly thick cookie dough, so they are very unlikely to spread enough to connect unless you place them practically touching.

Bake cookies for 8-15 minutes, depending on size. A toothpick inserted into the center of one should come out clean. As I mentioned, I like to make little bite-size cookies with my smallest cookie scoop, so they cook in 8 minutes; the larger the cookie, the longer the baking time. You can see that they puff and spread a little during baking, but they hold very much of the shape in which they are dropped. Transfer to a rack to cool.

This recipe also works well as a cake - the whole batch will make one 9x13 cake (bake for 20-30 minutes) or you can make mini cakes or even muffins which will take about 15-20 minutes. I used the last of the dough for one mini heart cake so I wouldn't have a partially filled cookie sheet.

And here's the recipe:

Pumpkin Chocolate Chip Cookies
1 15-oz can pumpkin (or 2 cups fresh)
1 1/2 cups sugar
1 egg
1 1/2 cups oil
2 tsp baking soda
2 tsp (rice)milk
4 cups flour (all-purpose or white whole wheat, or a combination)
4 tsp baking powder
2 tsp cinnamon
2 tsp vanilla extract
10-12 oz chocolate chips

Whisk together pumpkin, sugar, egg, and oil in a large bowl. Stir together baking soda and (rice)milk in a small dish and whisk that in as well. In a separate bowl, sift together flour, baking powder, and cinnamon. Stir the flour mixture into the pumpkin mixture in a few batches, then stir in vanilla extract and chocolate chips. 
Preheat oven to 375* and drop dough by cookie-scoop or spoonfuls onto a parchment lined cookie sheet, leaving space between cookies for growth during baking. Bake for 8-15 minutes, depending on cookie size. Alternately, bake a 9x13 cake for 20-30 minutes or mini cakes or muffins for 15-20 minutes. A toothpick inserted into the center of a cookie/cake/muffin should come out clean. Transfer to a rack to cool. 

Enjoy!                                            
Sue

Friday, August 23, 2013

Chinese Chop Suey

Now that my husband and toddler and I have completed our move to the new place and my kitchen is put back together, and we FINALLY have internet again after almost 3 weeks without it.....I can finally start cooking and blogging again. You know, it's nice to eat out occasionally and not have to clean your kitchen up after cooking, but when you have to eat out because your kitchen is packed and you can't find the boxes with the pots and pans or dishes and silverware a midst all the other boxes...and when you do find them, the cabinet locks haven't been installed yet so your VERY quick toddler pulls everything out of the cabinet as soon as you put it in......it gets REALLY old. So I am very happy to say that the cabinets and drawers are secured and everything is in it's place and I can cook again!! Woot woot! 

This is one of those recipes our Grandmother made, and subsequently our Mother makes. I'm honestly not sure where this recipe came from originally.  I have altered the recipe a little from the way our Grandmother made it. She used canned bean sprouts and the liquid from the cans, where as I prefer fresh bean sprouts and beef stock. I also decreased the amount of onions she used and add in some bok choy, which is what our Mother does as well. Our Grandmother usually served this over mashed potato, which I actually do like even though it sounds a little odd....but hey, who doesn't eat some odd combinations now and then, right? I made Jasmine Rice to go with it this time. One of our cousins told me a few nights ago that her Dad likes to eat it on white toast. So you can serve this over whatever you want really. If you want it with pasta I'm sure that would work too.  Ok, on to the recipe.


In a large saute pan or sauce pan, heat a little olive oil over med heat. Add the onion, celery and bok choy with a pinch of salt, pepper and garlic powder to taste. Cook until they begin to soften.

Meanwhile, in a separate pan cook the ground beef until it's done. 

Add the cooked ground beef, bean sprouts, soy sauce and beef stock (and mushrooms if you're using them-I didn't this time as my husband does not like mushrooms).

And cook for a few min until the veggies soften. Stir in the cornstarch water mixture and cook a few min until the sauce thickens. If you want it thicker, add a little more cornstarch and water until you get the consistency you're looking for. 


I served it over rice, but you can serve it over mashed potato (the way our Grandmother did), or toast (the way one of our Uncle's likes it) or even pasta if you wish. I didn't have any crispy chow mein noodles (found in the Asian isle in most grocery stores) at the time but you can top it off with a handful of them for a little crunch. 


Chinese Chop Suey

1 lg onion, sliced
4 lg stalks celery, chopped
6 bok choy stalks, chopped
1 12 oz bag fresh bean sprouts
1 lb ground beef
1/2 C  soy sauce
about 2 C beef stock
8-12 oz fresh mushrooms, sliced or 2-3 4 oz cans sliced mushrooms, optional
salt, pepper and garlic powder to taste
2-3 t rounded cornstarch stirred into 1/2 C water
In a large skillet or saucepan cook onions, celery, and bok choy with a pinch of salt, pepper and garlic powder to taste in a little olive oil until they begin to soften. In the meantime cook ground beef in a separate skillet with a little salt pepper and garlic powder if you wish until done. Add ground beef, bean sprouts, soy sauce and mushrooms if using to vegetable mixture. Stir in beef stock. Cook a few min until veggies soften. Stir together about 2-3 rounded teaspoons of cornstarch into 1/2 C water and stir into chop suey. Cook a few min until it thickens. Serve over rice. Gramma usually served this over mashed potato.Top with warmed chow mein noodles for a little crunch of you like.


Enjoy!                                            
Sandi 

Monday, August 19, 2013

Hello? Is anyone here?

It occurred to me that both of us sisters have been quiet for a while, and some of you may be wondering where we have gone. Well, I just wanted to assure you all that we are still here, and we'll be back to blogging very soon!
Just to give you an idea of what else is happening in our lives: One of us just completed a move to a new home, and is still settling in with the help of an energetic toddler. The other of us had a little vacation away from it all, and is adjusting to the new mobility level of an 8-month-old and all the fun of continued baby-proofing. So blogging has been pushed a little to the back burner so to speak for both of us for a little while.
Things are starting to settle out a bit more for both of us, so I promise you'll hear more from us soon! Thanks for reading!
Sue

Sunday, July 28, 2013

Pig Candy

So most of you are probably thinking "What the heck is pig candy???" and some of you are probably imagining a variety of creative things... Well, I'm not sure how the name 'pig candy' was first applied to these delicious pork ribs, but it sort of stuck because eating them is a little like eating candy - they are so good, it makes you feel a little giddy. 

I adapted this recipe from one by Alton Brown that I found when I wanted to try a new method for preparing babyback ribs. I have also used this same recipe to prepare a bone-in pork butt roast with great success, but I think ribs are probably the favorite medium in my house. 

Start with your spice rub: combine the brown sugar and all the spices in a small bowl.

Once your spices are mixed, lay out your rack of ribs (this one is actually pork spareribs rather than back ribs, they both work very well) on double aluminum foil. Rub the spices all over the meat, front and back. 

Then lay another sheet of foil over the top of the ribs, and fold up the upper sheet from underneath the ribs to make a neat little packet. Be sure to leave one short edge loosely sealed, so you can easily open it. Then pop the packet back into the fridge for at least one hour to give the spices time to really flavor the ribs.

Here is why you want one short edge easy to open. Right before you are ready to start cooking, mix up your braising sauce and microwave for one minute. Then open that short edge of your foil packet, pour the sauce inside and reseal the foil packet. Tilt the pan to be sure the sauce distributes all the way down the rack.

Then fold up the extra sheet of foil underneath to contain any sauce that comes out of the packet. You might be tempted to skip the double layer of foil to begin with. Don't - really. I can tell you from experience that any holes the bones poke in the foil will cause all the sauce to drain out and burn onto your cookie sheet. It isn't pretty. And you also lose that flavor for the ribs. So do yourself a favor and use double foil underneath. And into the 225* oven for two and a half hours for a nice slow braise.

At the end of the cooking time, open the foil packet carefully at that easy open edge you left and pour the sauce into a medium saucepan. You can open the packet all the way and admire how the ribs are separating from the bone - they are essentially done now, we are just going to add more flavor in the last step. 

Simmer the sauce to reduce - this will take at least twenty minutes, to get from a watery state to a more syrupy state. Pour the syrupy sauce over the ribs. Marvel. But wait - we're not done!

Pop those beauties under the broiler for a couple minutes to caramelize that lovely sauce. Mmmmm.

Cut the ribs into sections containing one to three bones each. You choose based on your serving desires and your patience to cut between each bone. I usually do 2-bone sections.

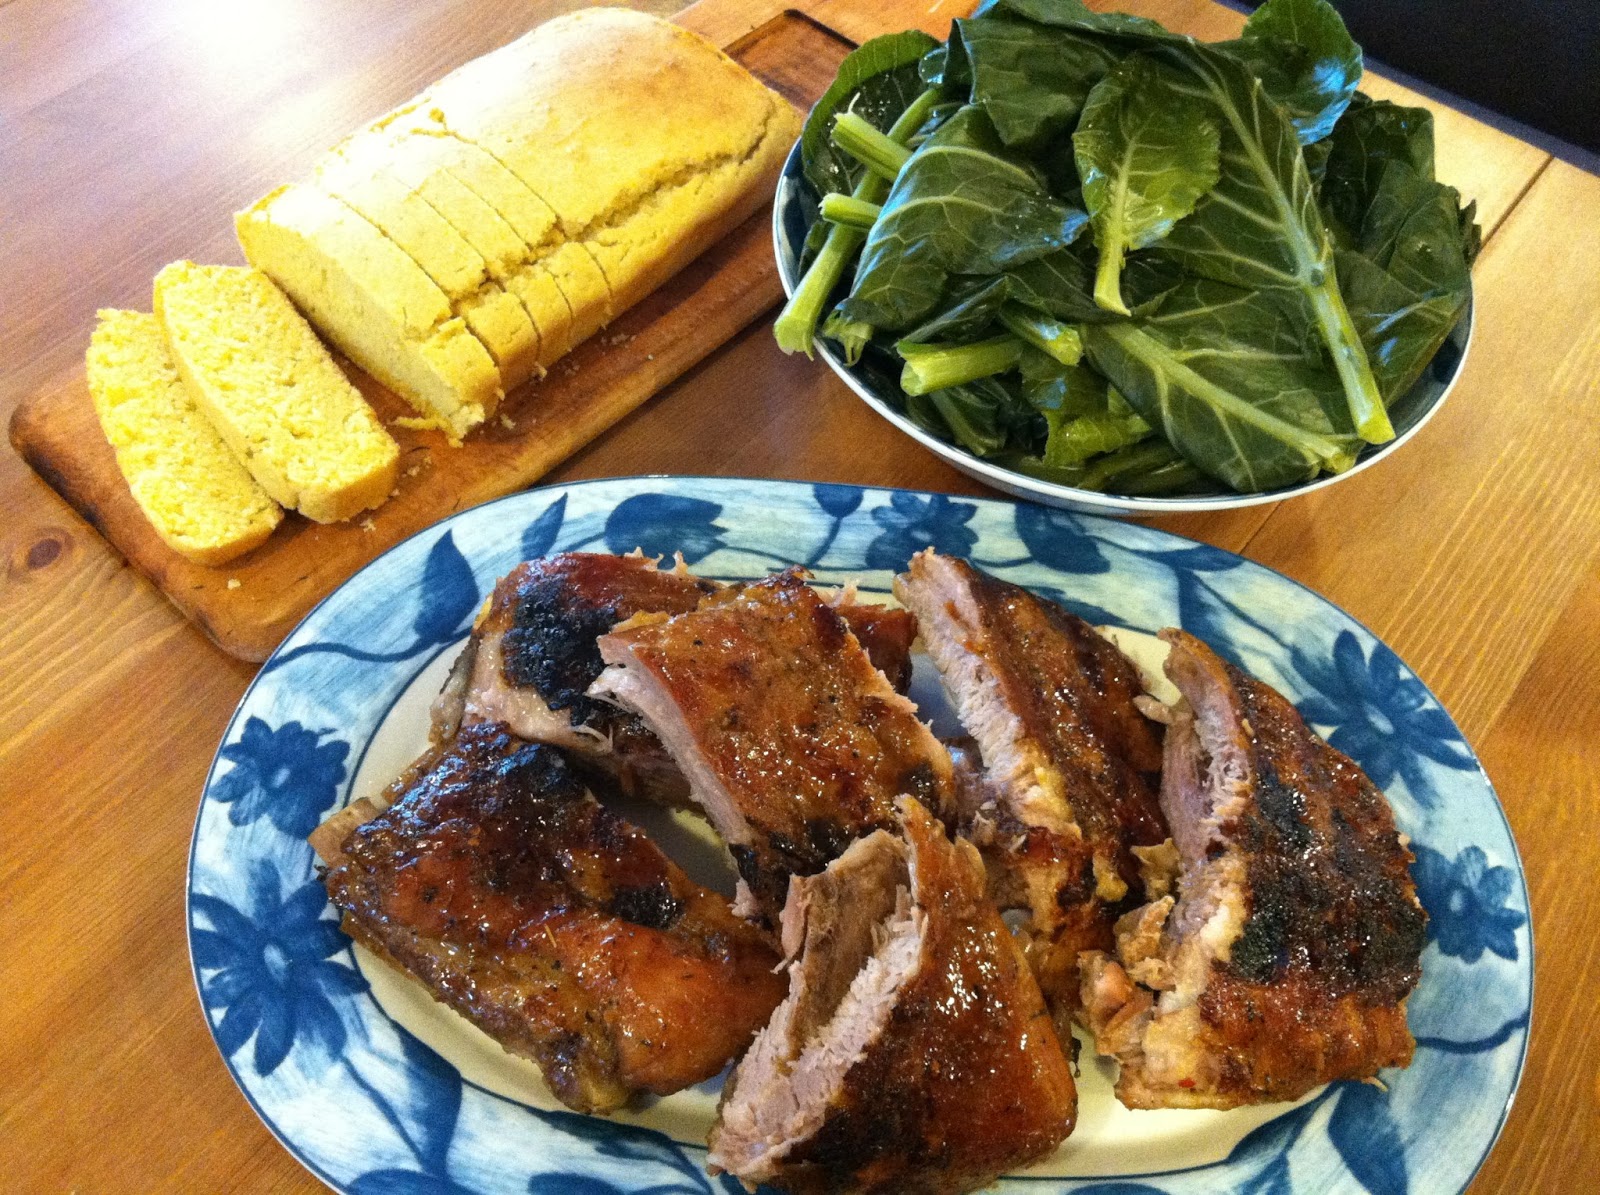
Serve with your favorite accompaniments. We love these ribs with cornbread and collard greens. 

Pig Candy
1 rack pork back ribs or spare ribs (or other bone-in cut of your choice weighing about 2-3 lbs)

Spice Rub
2 Tbsp brown sugar
1 tsp sea salt
1 tsp chili powder
1/4 tsp thyme
1/4 tsp cayenne
1/8 tsp fresh ground black pepper
1/8 tsp crushed red pepper
1/8 tsp Old Bay seasoning
1/8 tsp onion powder

Braising Sauce
1/2 cup wine (use whatever you have open, either red or white work fine)
1 Tbsp red wine vinegar
1 Tbsp Worcestershire sauce
1/2 Tbsp honey
2 cloves garlic, minced

Combine all ingredients for spice rub in a small bowl. Lay out ribs on double layer of aluminum foil, rub all over with spice rub. Cover with another sheet of foil and fold into a packet. Refrigerate for at least one hour.
Preheat oven to 225*.
Combine all ingredients for braising sauce in small measuring cup. Microwave one minute. Open one end of foil packet and pour sauce in, tipping to distribute sauce all along the ribs. Reseal foil packet, fold extra sheet of foil up around packet. Bake for 2 1/2 hours.
Carefully open one end of packet and pour sauce out into medium saucepan. Simmer sauce to reduce, at least twenty minutes, until it reaches a syrupy consistency. Remove foil from top of ribs, pour sauce over ribs. Broil for 2-4 minutes, until sauce is caramelized.
Cut ribs into sections of 1-3 bones each. Serve with your favorite accompaniments.

Enjoy!                                            
Sue